If you only have a Google Ads Performance Max campaign for your ecommerce store, you’re missing sales. There’s a right way to run Performance Max that’s working great for my Shopify Google Ads clients after testing dozens of setups.
In this article, I’ll show you a simple strategy that consistently performs better and it only takes a few minutes to do.
Unlock the Best Performance Max Structure
Click here for the cheat sheet to help you structure your Google Ads Performance Max campaigns to separate high-intent from low-intent traffic and stop wasting ad spend.
Why Running Only One Performance Max Campaign Is Costing You
People see Performance Max and say, “Ooh, I can reach audiences across all of Google with a single campaign! Sounds great!” And to be fair, that’s exactly why so many smart store owners buy into it.
But this leads to lazy thinking and poor results.
Performance Max distributes your budget evenly like your Year 2 PE teacher giving everyone a participation medal whether you did well or not. This happens in all campaigns, but it’s chronic in Performance Max.
When you make this mistake, you donate Google your profits on a silver platter. And the frustrating part is, it usually doesn’t look broken.
We had a client with this exact issue. Within a couple of months of us coming on board, they started hitting targets again with uncapped budgets.
The surprising thing is that established stores can fall into the same mistake. The store I just mentioned had a decade’s worth of data. And that’s important, because this isn’t a lack-of-data problem. It’s a Google ad setup problem.
The Fix: Separate High-Intent from Low-Intent Searches in Google Ads Performance Max
The good news is there’s a simple fix that’s fast to do. The key change is separating high-intent searches from low-intent searches. But keep reading until the end, because there’s a tricky gotcha to avoid.
High-intent searches like your brand name, the brands you stock, or specific product attributes that have historically performed well, are bottom-of-funnel searches. That means they’re close to or ready to buy.
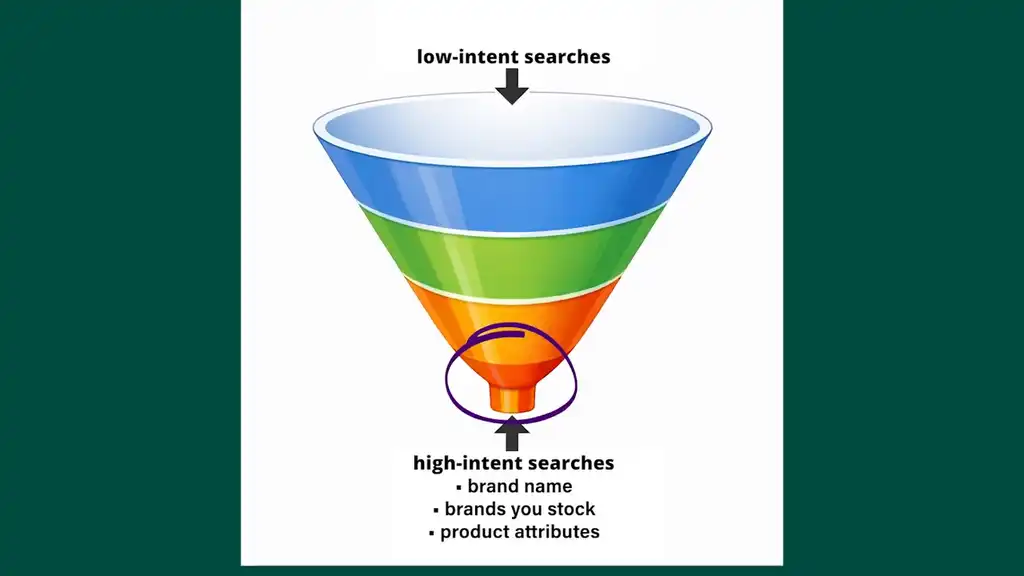
So they need to be in their own dedicated campaign. By doing this, you can control spend for these higher-value searches.
And this is the key point: high-intent and low-intent searches should not be competing inside the same budget, because they’re not doing the same job. That’s the structural mistake. So let me show you exactly how to fix this without creating overlap or starving the wrong campaign.
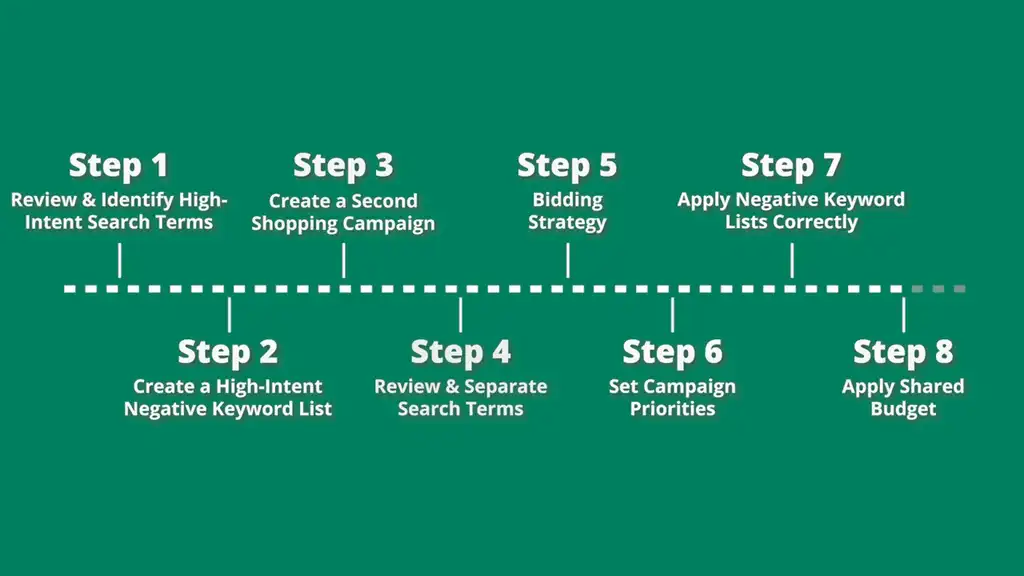
The 8-Step Performance Max Strategy
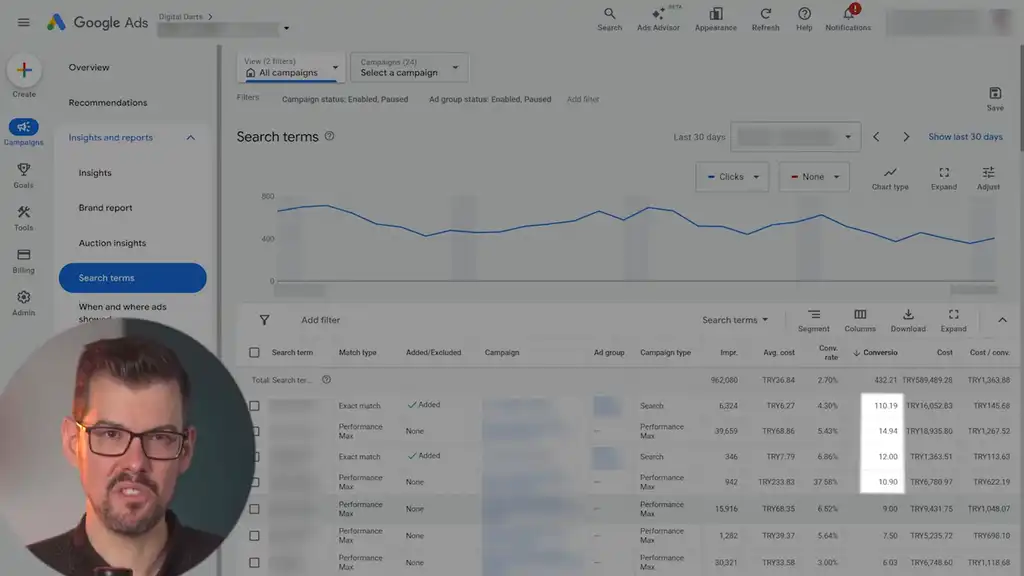
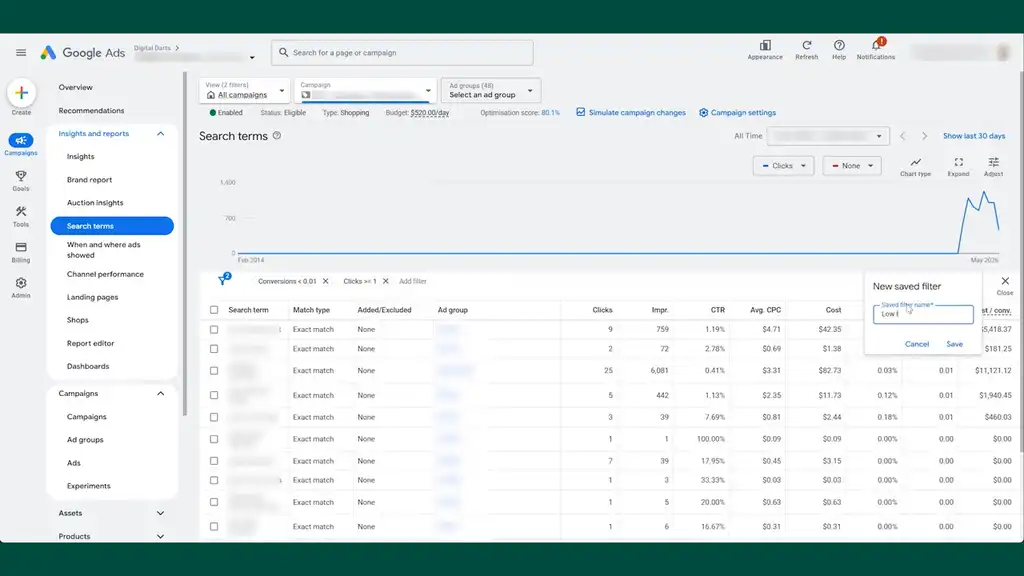
Step 1: Review Your Search Terms and Identify High-Intent Queries
Review all search terms from all your campaigns, live and paused, and identify any that drove conversions from high-intent searches. You can eyeball this data yourself or use a Google Ads script to extract it. Take note of the conversion value/cost these high-intent searches achieved.
This gives you the list of queries that have already proven they deserve special treatment.
Step 2: Add High-Intent Terms to a Negative Keyword List
Add these terms to a negative keyword list named “High Intent.” Wrap the searches in square brackets so they’re exact match. That exact match detail matters, because then you’re only including the high-converting searches.

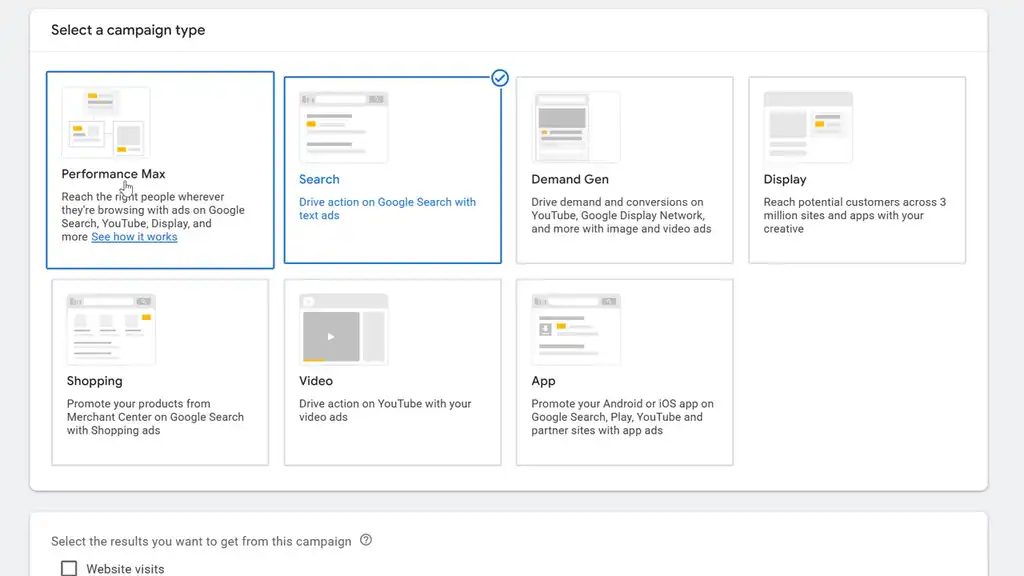
Step 3: Create a Second Shopping Campaign
Assuming you’ve only been running one Performance Max or Shopping campaign, create a second Shopping campaign. I recommend Standard Shopping. And yes, there’s a reason I’m bringing Standard Shopping into a Performance Max strategy in 2026. This is where it earns its place.
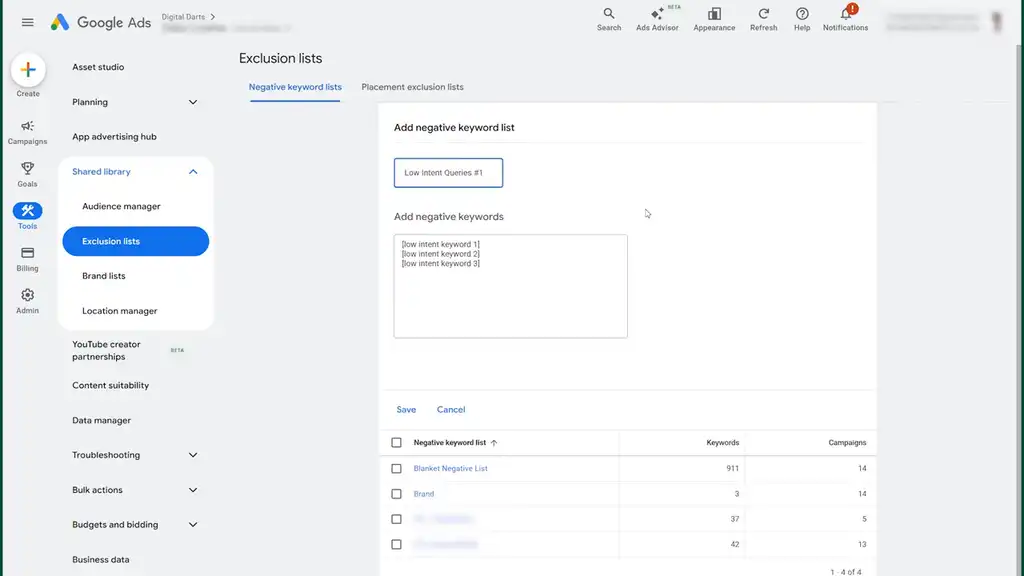
Step 4: Separate Low-Intent Searches into Their Own Negative Keyword List
Review all search terms from your original campaign that’s been running both low and high intent. Filter out all the high-intent terms. Save the low-intent terms to a new negative keyword list, exact match, and name it “Low Intent Queries #1.”
At this point, you’ve effectively separated the two intent buckets. Now we need to make sure Google treats them differently.
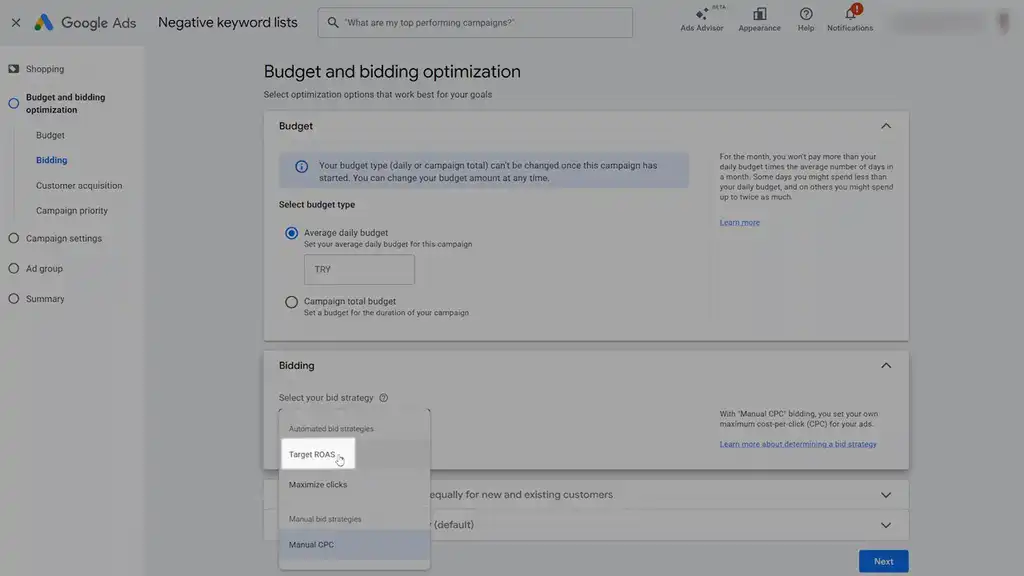
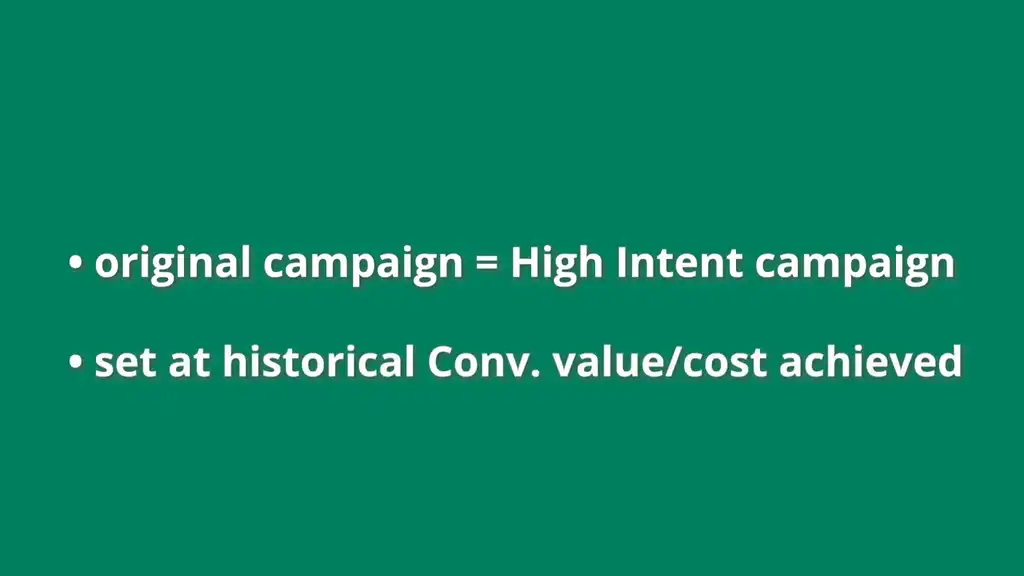
Step 5: Set Target ROAS Bidding for Both Campaigns
Set the bidding strategy as Target ROAS for both campaigns. Make your original campaign the High Intent campaign and set it at the historical conversion value/cost achieved by those high-intent searches. For the Low Intent campaign, set it slightly below that.
That way, your strongest searches are held to the standard they’ve already shown they can hit, while the lower-intent traffic has room to explore without dragging everything down.
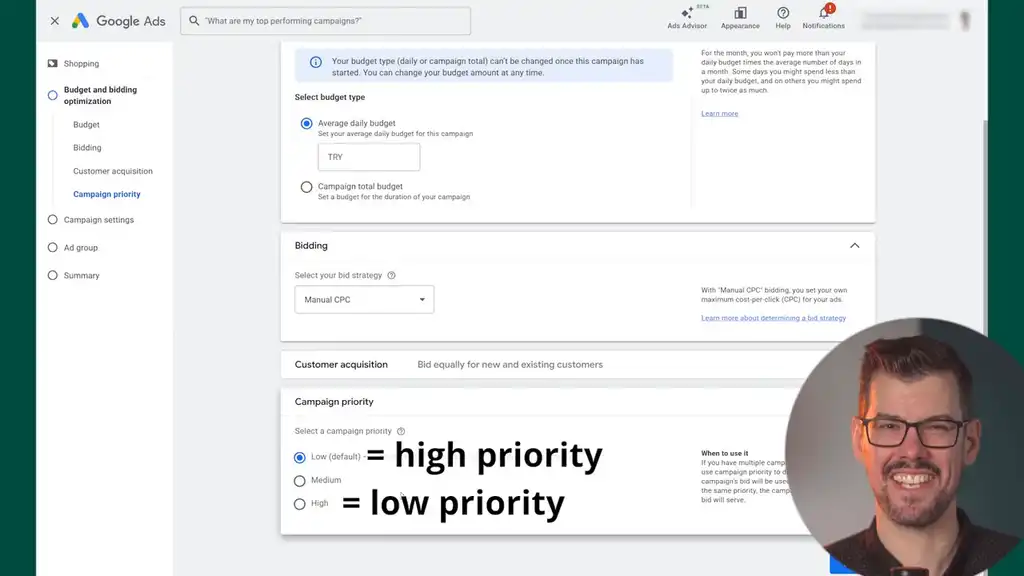
Step 6: Set Campaign Priorities
Set campaign priorities: High Intent = low priority; Low Intent = high priority. This is one of those counterintuitive settings that makes more sense once you see how the next step directs the traffic.
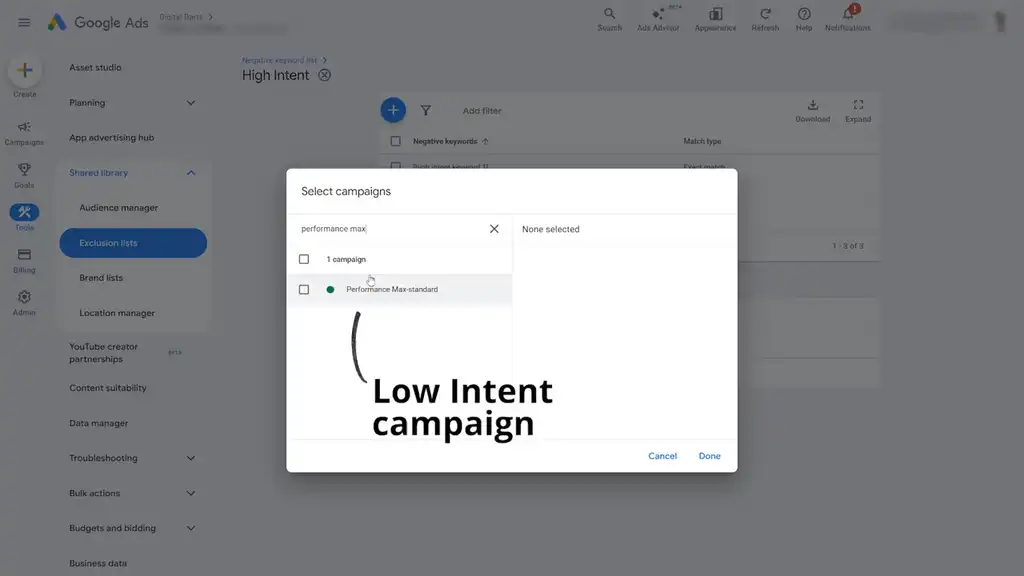
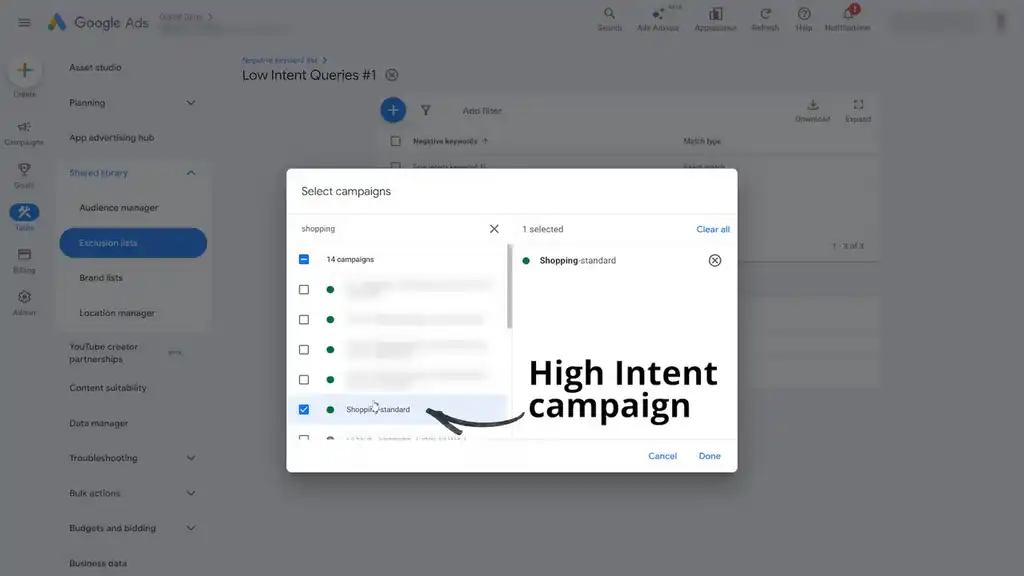
Step 7: Apply Negative Keyword Lists to the Right Campaigns
Apply the negative keyword lists correctly. Apply the “Branded/High Intent” list to the Low Intent campaign. Apply the “Low Intent Queries #1” list to the High Intent campaign.
Get this part right and you’ve funnelled traffic to the right places. Get it wrong and the traffic will leak across campaigns.
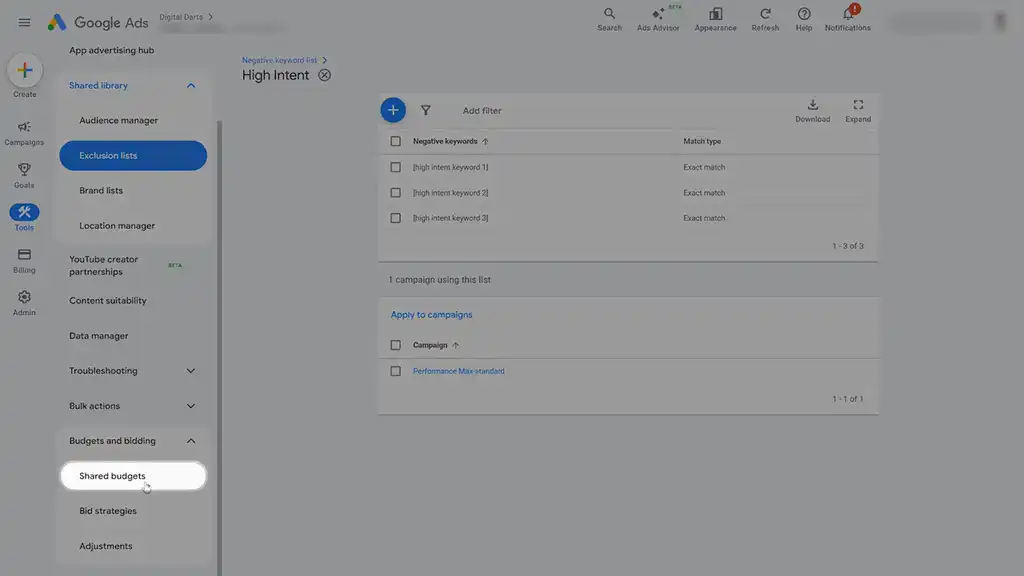
Step 8: Apply a Shared Budget and Avoid This Common Gotcha
Apply a shared budget across both campaigns. This is the gotcha I mentioned earlier.
A common mistake is trying to “game” the setup by giving the Low Intent campaign a smaller or separate budget. When that budget runs out, low-intent searches not yet added as negatives can spill into your High Intent campaign.
Using a shared budget early ensures High Intent traffic isn’t diluted. Later, as you refine negatives and performance stabilises, you can split budgets.
So early on, don’t optimise for control at the cost of clean traffic separation. Protect the structure first.
Keeping the System Getting Smarter Over Time
Once live, refine negatives as searches come in and monitor results. Even strong accounts take time to ramp up. How do you refine negatives? Use the method from Step 1.
That’s what keeps the system getting smarter over time: you’re continuously teaching each campaign what belongs where.
And once you’ve done this, Performance Max stops acting like a black box and starts behaving more like a controlled growth channel.
Now you’re using Google Ads Performance Max the right way, splitting out high-intent from low-intent searches. But there are still dozens of other ways Google Ads can chew up your budget without you realising it. This is only one leak. To fix the rest, read my next article on the biggest and most common Google Ads budget drainers and how to plug them.
What You Should Do Next...
Get More Free Tactics
Subscribe for tutorials and tactics to grow your Shopify store. You'll also immediately download the 30+ page deck "4 Rules of Store Growth: To Sell More on Shopify, Escape Work You Hate, Boost Profit, and Have a Business You're Proud Of".
Work With Us
We partner with a small number of Shopify stores each quarter to scale paid ads, SEO, and conversion rate. If you're serious about growth, apply below. If it's a fit, we'll schedule a call to map out your plan.
APPLY TO WORK WITH US
