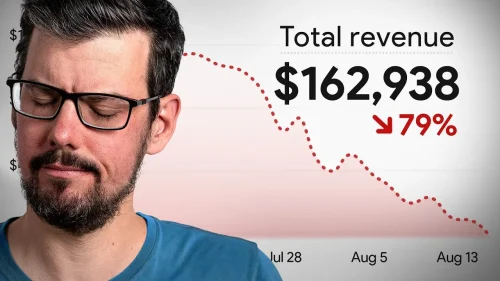
Everyone talks about Meta and Google Ads for scale, but Microsoft Ads has quietly become one of the most profitable channels for some Shopify stores. We added $100,000 a year for one client from new shoppers and was getting both better order value and cost per sale.
In this tutorial, I’ll show why it works, the right way to set it up to save you time and bring you more profit, and the one setting that can make or break your account.
Instantly download the FREE ads guide
Get your free 39-page guide to launching profitable ads without wasting budget and get free weekly Shopify growth tactics.
Why Microsoft Ads Works When Everyone Else Ignores It
Before we touch the account, you need to understand why this channel can work when everyone else ignores it. Microsoft Ads has two great advantages.
The first is, well, it has a bad hangover reputation with marketers. It used to be called Bing Ads. It feels like the old senile man down the road no one wants to hang out with because there’s ChatGPT ads, streaming TV, or AppLovin that seem more exciting.
But that gap is exactly where the money hides. The client I mentioned proves it.
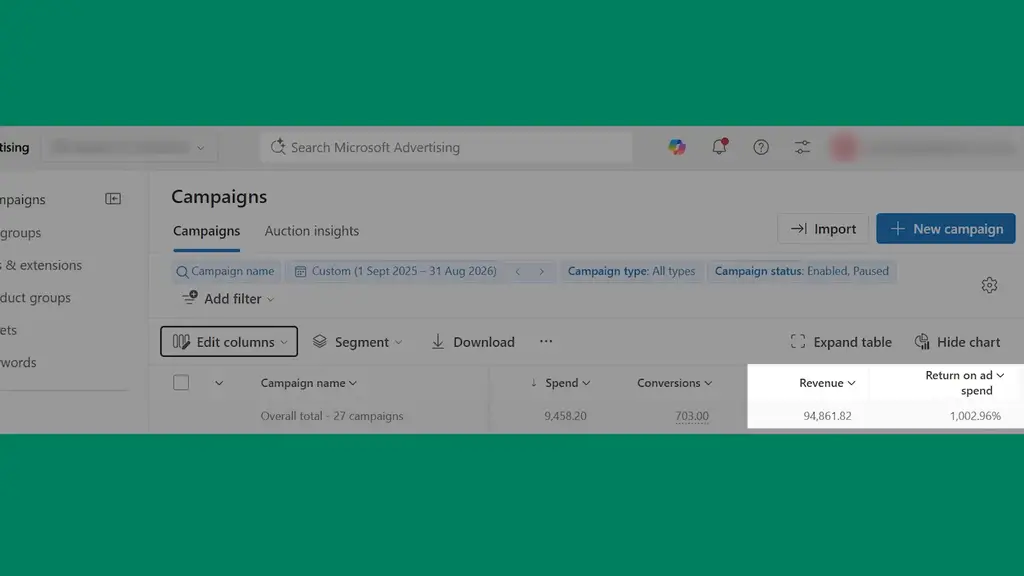
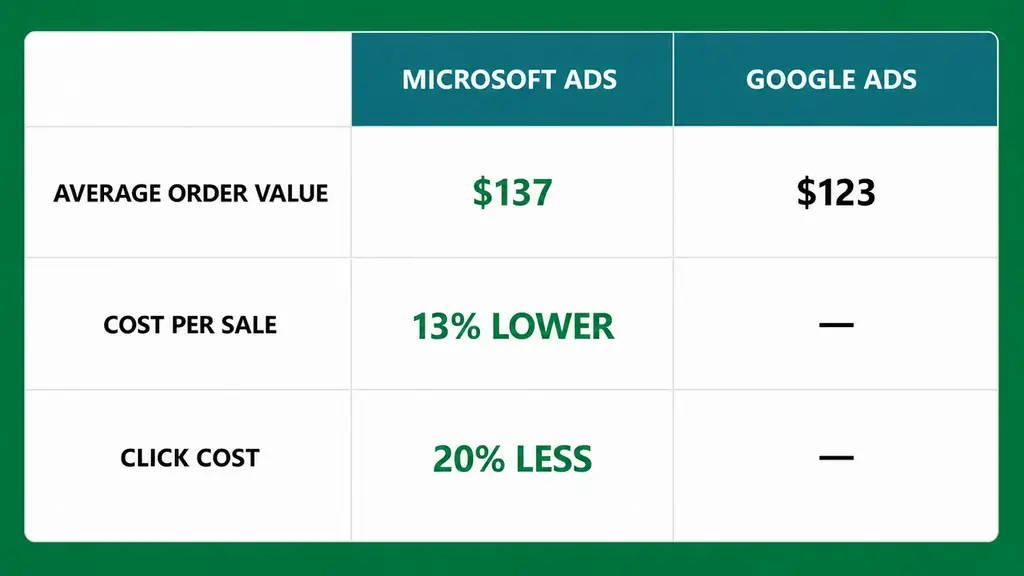
On Microsoft their average order came in at $137 against $123 on Google, their cost per sale ran 13 percent lower, clicks cost 20 percent less, and the channel added nearly $100,000 a year in new, non-branded revenue. They’re not even in a major country like the United States.
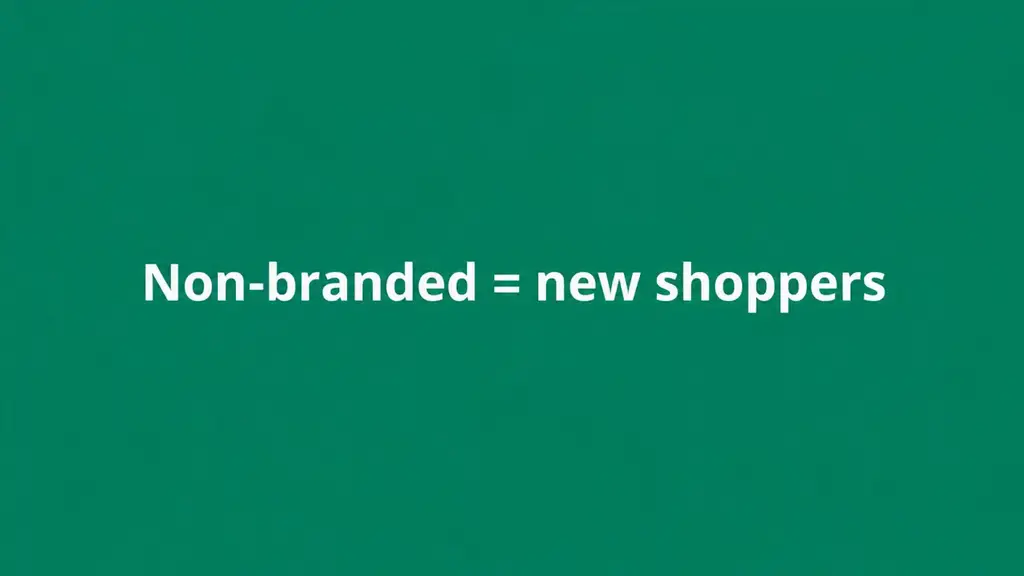
Non-branded means these were brand new shoppers, not people who already knew the store and searched its name.
Cheaper Clicks Are Not the Only Advantage
The secret of Microsoft Ads comes with who actually uses Bing.
Look at these crazy stats from the same store. The 50-64 age range converted at an impressive 5.2%. And these baby boomers are cashed up, often retired, and hungry to spend money instead of passing it down to their children who can’t afford a home.
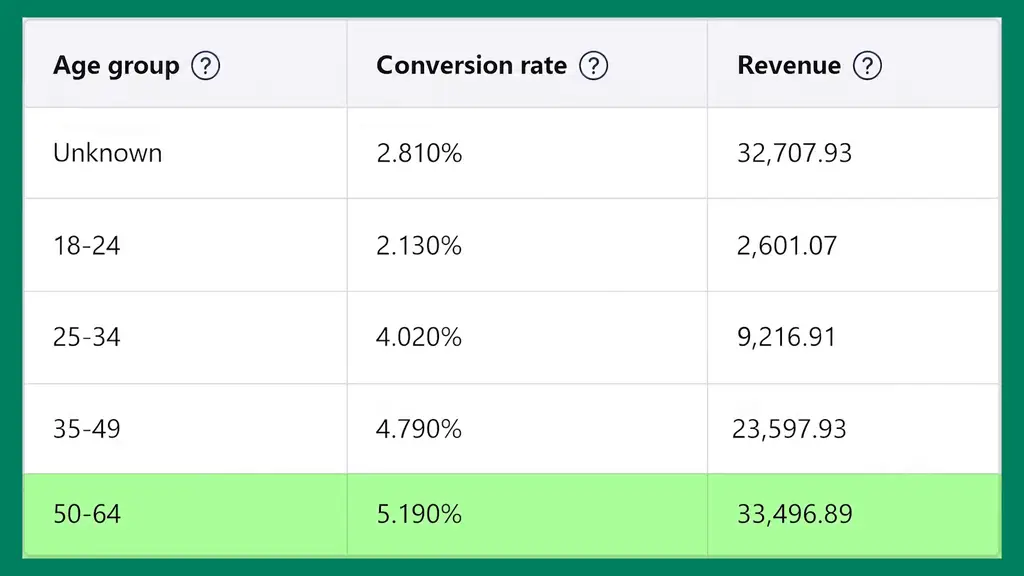
And why does the older demographic do better on Microsoft Ads? They are overrepresented there, because they likely bought a computer from their local computer shop and Microsoft Edge is the default browser, with Bing as the default search engine. They’re not technically advanced to swap browsers or search engines.
And because they see far fewer brain-rot ads than a twenty-something scrolling TikTok, simple creative and straight-forward offers may still grab their attention, saving you time and money on creative.
The older demographic is the biggest reason Microsoft Ads will either pleasantly surprise you, or just not be worth the effort. If you’re selling skin care to Gen Z, ads won’t do fantastic there but it could still be worth trying.
Treat Microsoft Ads as a Secondary Profit Channel
So here is the rule that makes the whole thing work for most stores. Treat Microsoft as a secondary profit channel, not your main scale channel.
After a decade of doing this, I can safely estimate you’ll probably cap out at 10% of Google’s volume, but the cheaper clicks and conversions make that slice worth it.
Think of it as opening a second checkout lane. It will not replace the main one, but it can process extra customers at an attractive margin.
I recommend every Shopify brand should test it for a few months. So here’s the setup to do it properly without rebuilding your whole ad system from scratch.
Step 1: Create Your Microsoft Ads Account
Create your free account at ads.microsoft.com. There’s no waitlist and no invite needed.
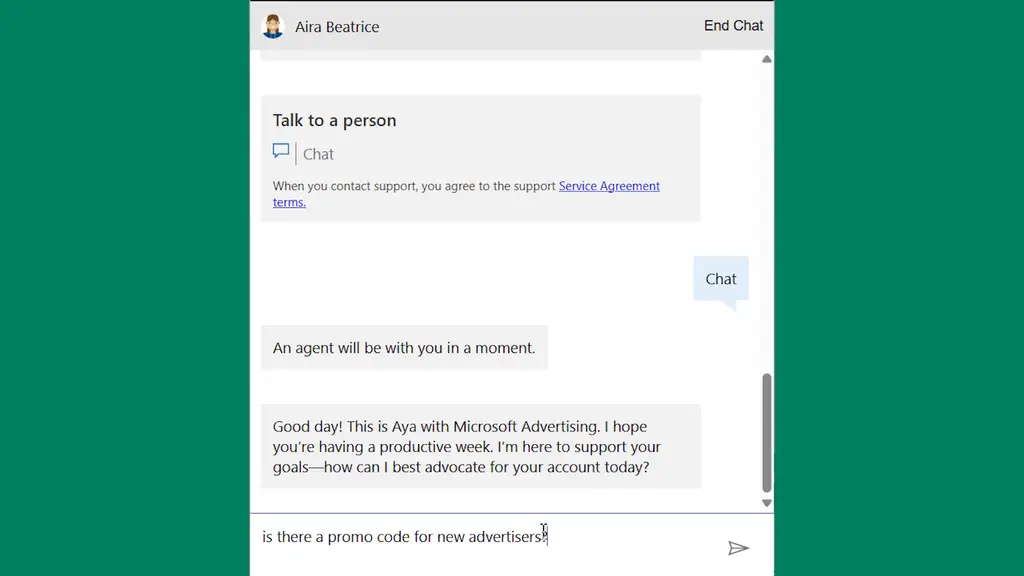
If this is the first ad account for your brand, message Microsoft’s ad support and ask about a promo code for new advertisers. Free ad credit for a five minute chat is the easiest win in this whole video.
Step 2: Import Your Google Ads Account and Choose the Right Settings
Microsoft has a built-in import tool that pulls your campaigns, keywords, ads, and budgets across in minutes. That means you do not need to rebuild everything manually.
But the goal is not to just clone Google blindly. Borrow the useful structure while keeping control of the settings that behave differently on Microsoft.
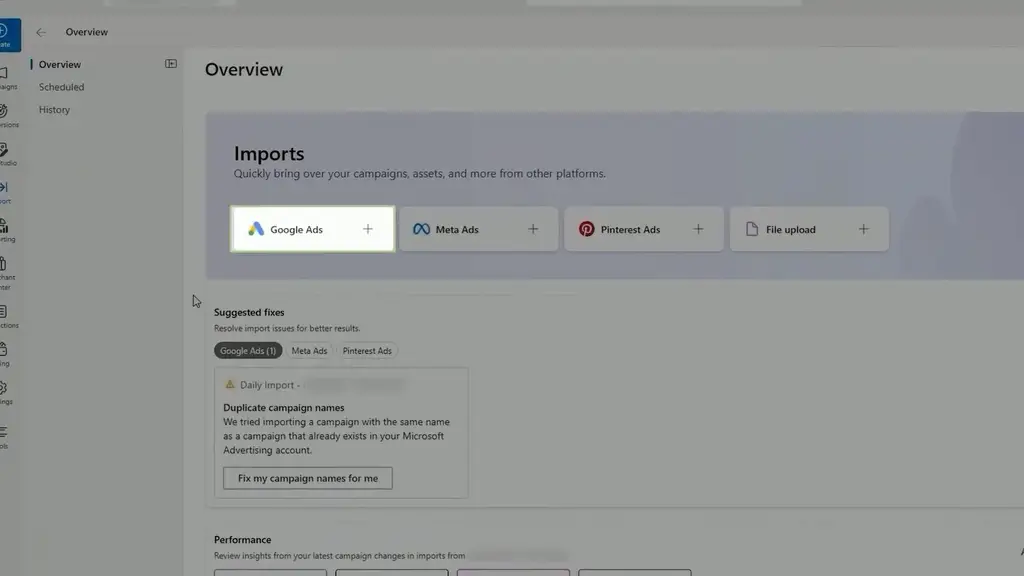
There’s a few gotcha settings and common mistakes here so you’ve got to do it right.
Set the Import Schedule
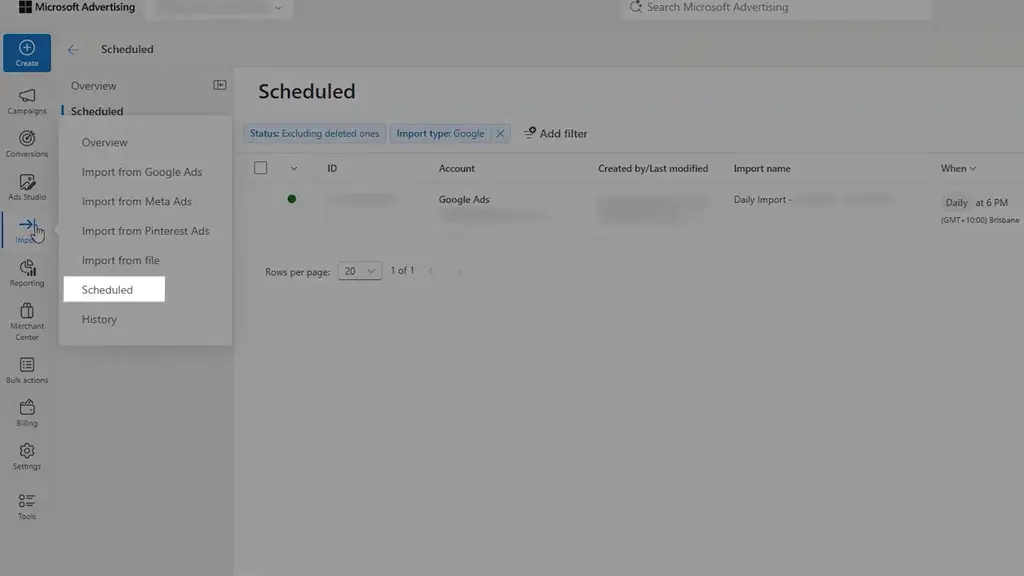
Go to “Import”, “Scheduled” where you can import from Google Ads on a daily basis, and click edit. Click “Custom”, then continue. If you’ve got multiple Google Ads accounts, your current one should be selected, and click next.
Configure the “Customize your schedule” to suit your timezone, an hour after you’re likely to finish making changes in Google Ads. So if you can make Google Ads changes up to five o’clock, then configure this to import at six o’clock, an hour after. That one-hour buffer makes sure Microsoft has time to finish the import.
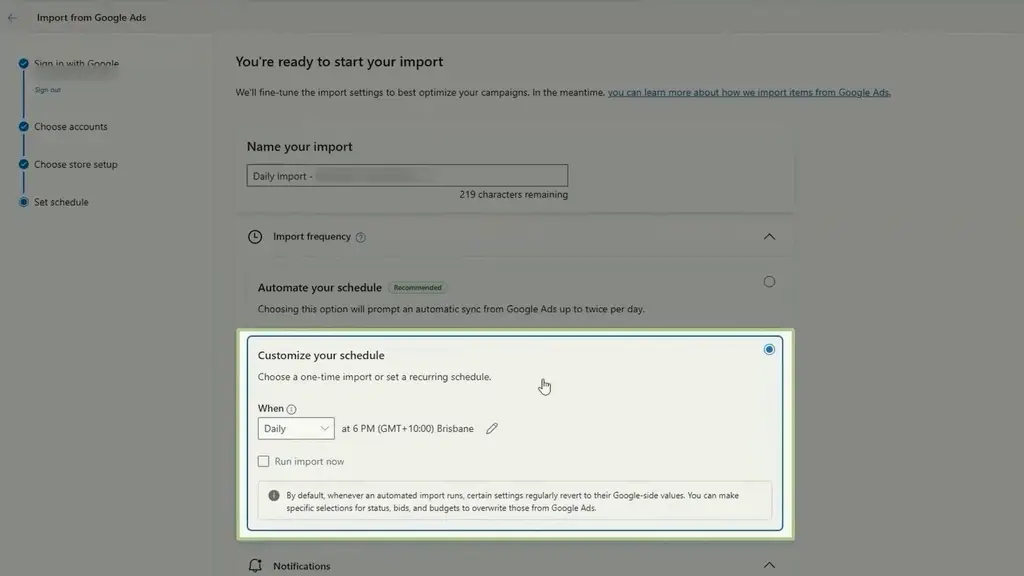
This daily auto update schedule means your Microsoft Ads automatically stays up to date with any changes you make in your Google Ads without you thinking about it.
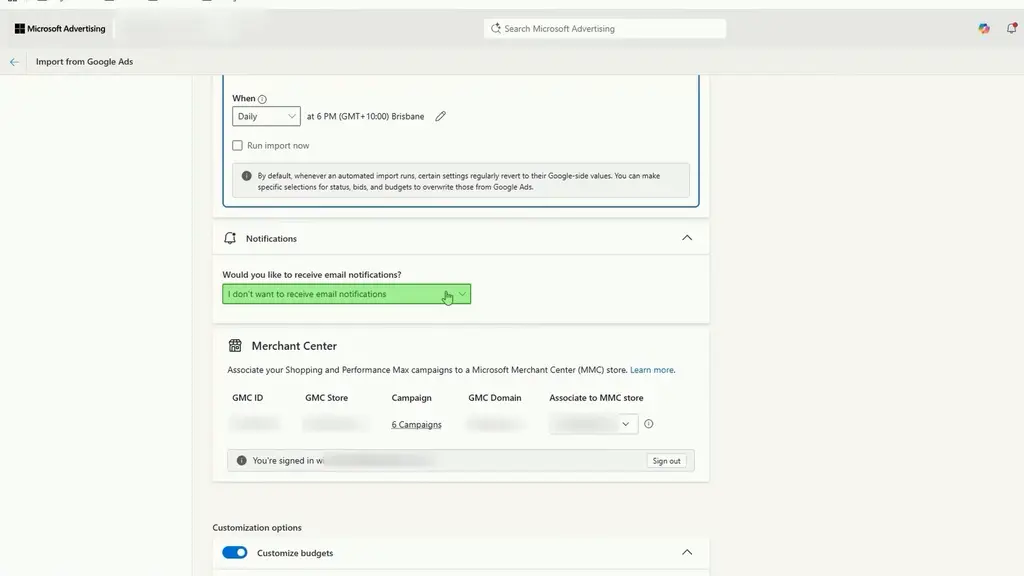
I suggest turning off the email notifications, you don’t need to be notified of import changes, it can just bloat.
Customise Budgets and Bids
Enable “Customize budgets”, and “Customize bids”. You don’t want the same budgets, or the same bids as Google Ads because performance, search volume, products, and keyword competition, it’s all different.
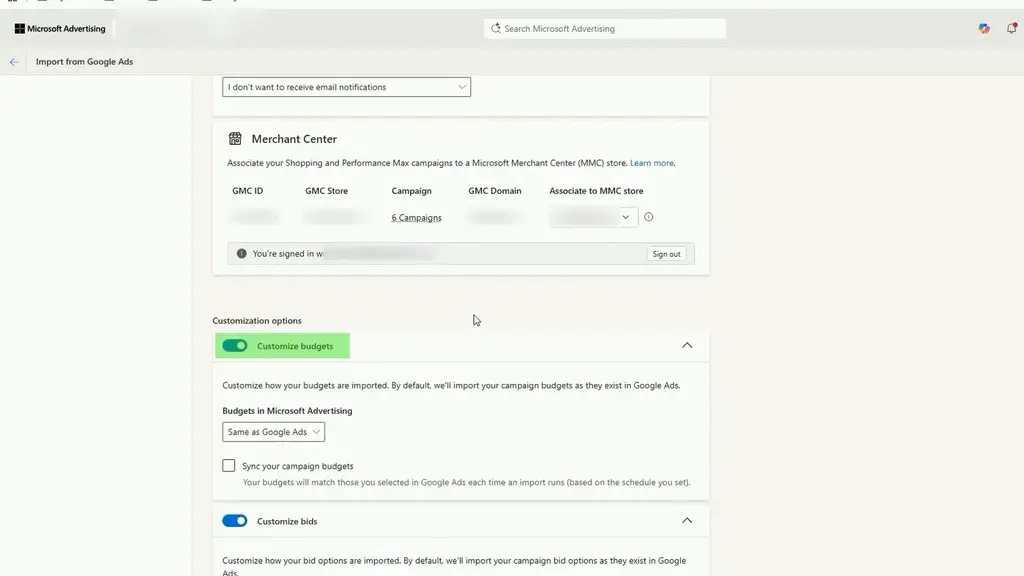
You’ll likely have lower budgets for an extra safety measure. You can put a placeholder and fix the budget strategy after import.
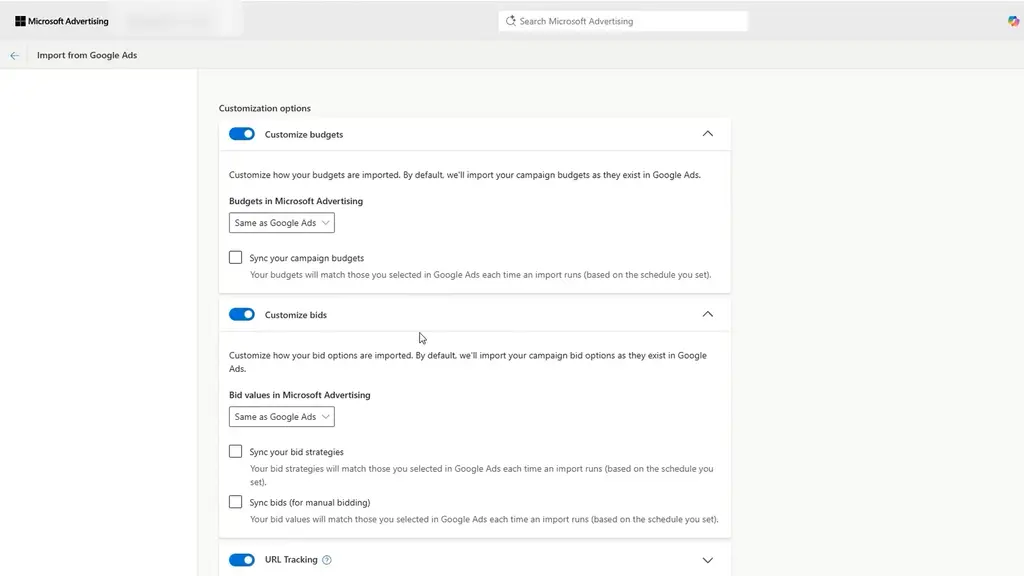
If you have URL tracking you can add that.
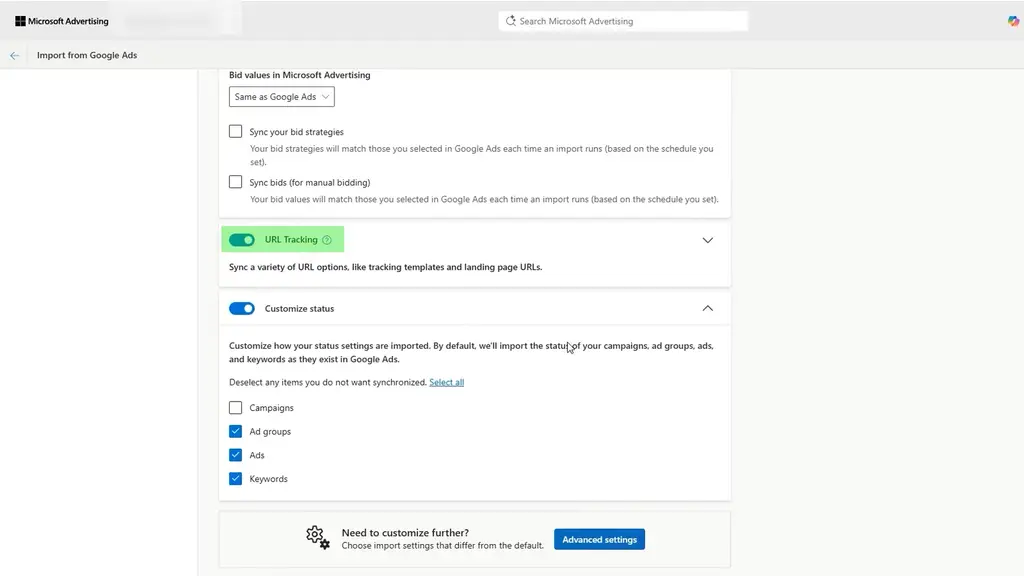
Customise Status
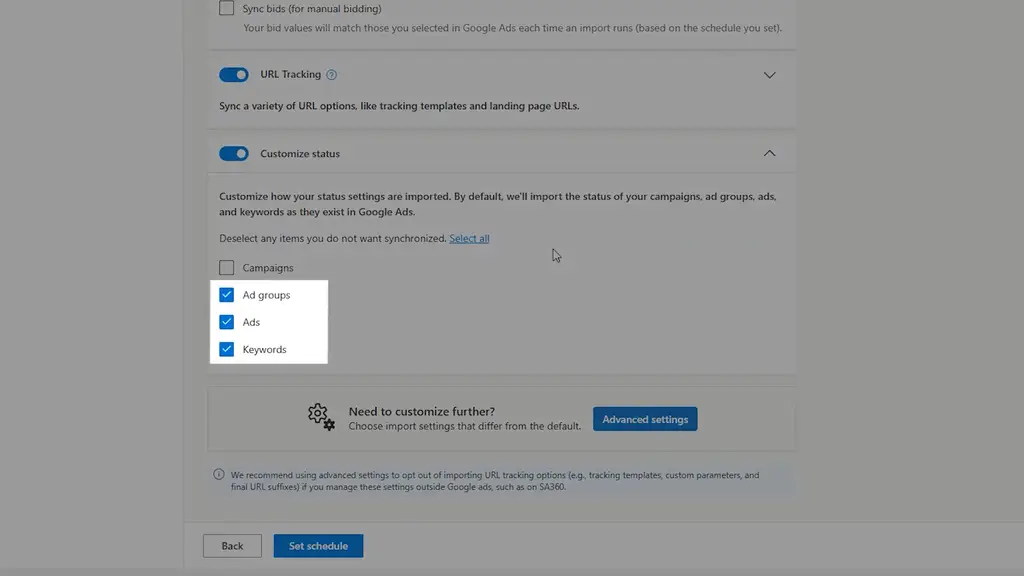
For “Customize status”, the right choice depends on your account. A good default is to not import the status of “Campaigns” because you’ll have some unique campaigns in Microsoft. For example, I don’t like the equivalent of performance max campaigns in Microsoft Ads, and so the import for that doesn’t make sense.
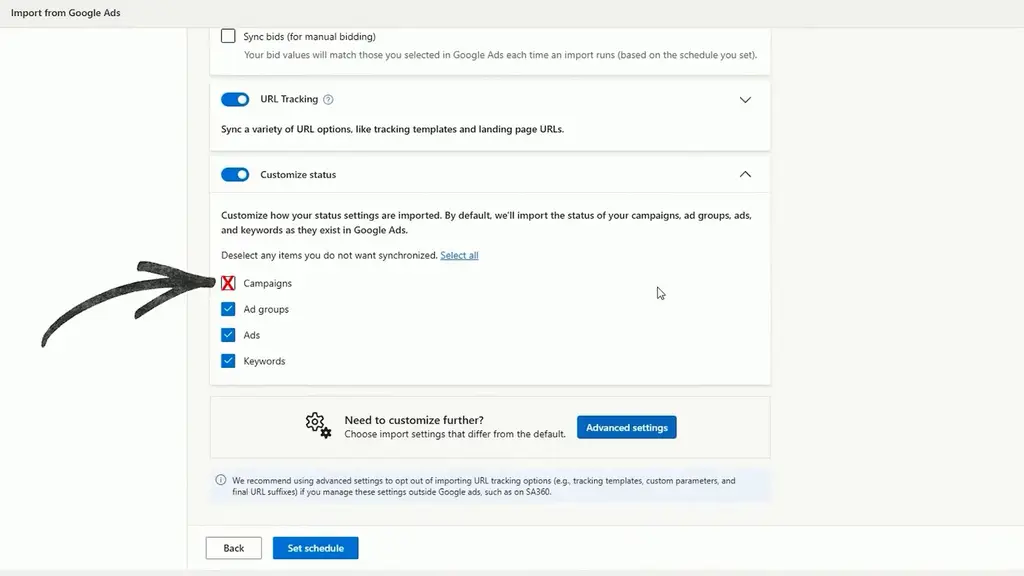
And if you have product segmentation or completely different bidding strategies, you might not want all your campaigns to mirror each other.
It would be very unusual to not have ad groups, ads, and keywords enabled.
Advanced Settings
Under “Advanced settings”, select the campaigns you want to import.
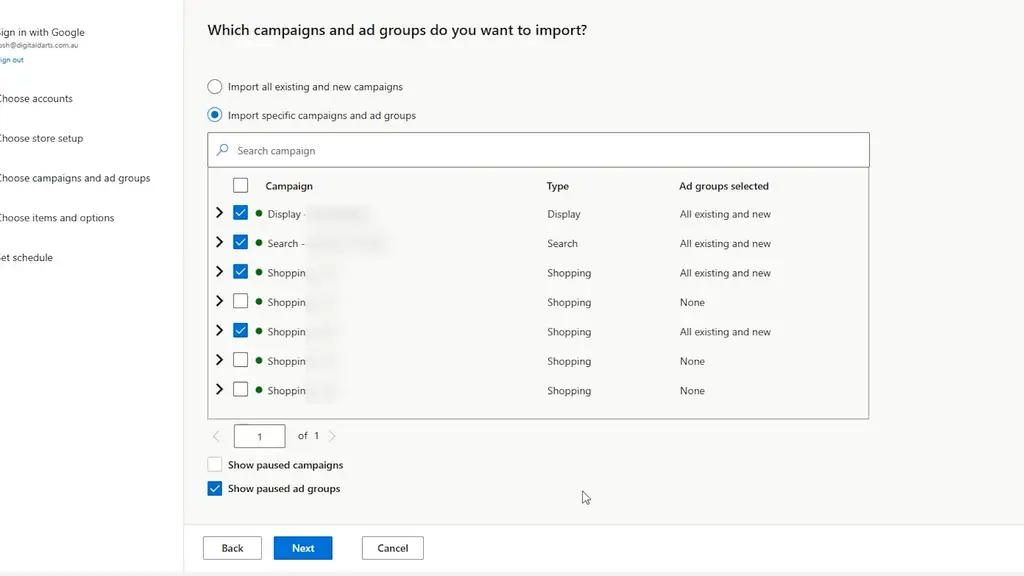
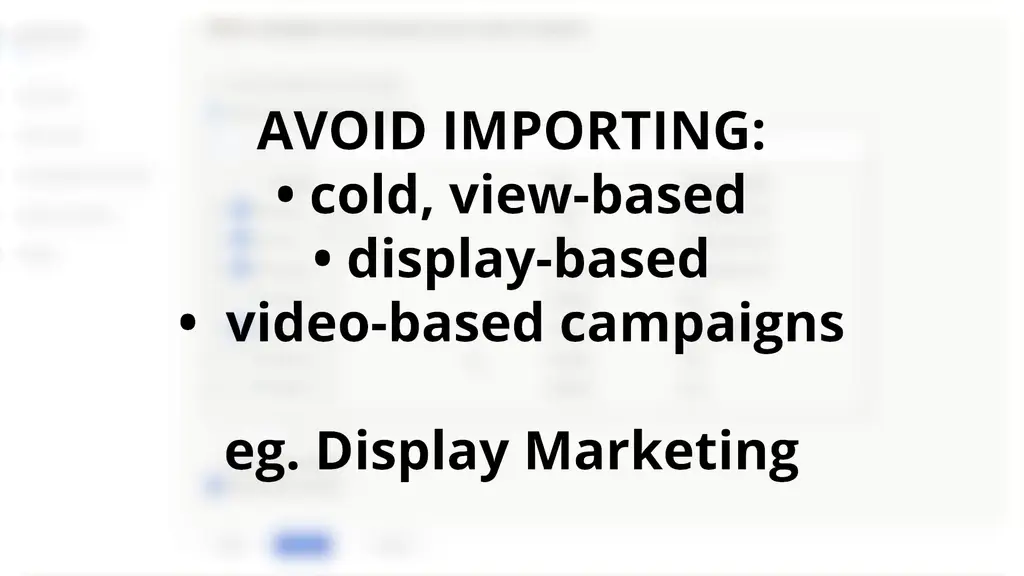
If you don’t know what campaigns you want from Google Ads, you can import them all. But I recommend you avoid importing cold, view-based, display-based, video-based campaigns, like Display Marketing. Microsoft doesn’t do well with raw demand generation across the display network like Google Ads is doing right now with Demand Gen.
Click next. You see here I’ve got most things enabled for campaigns, except targeting “Topic targets” is disabled to help avoid import errors in Microsoft, and be careful not to override any existing negative keyword lists that you’ll create specifically in Microsoft.
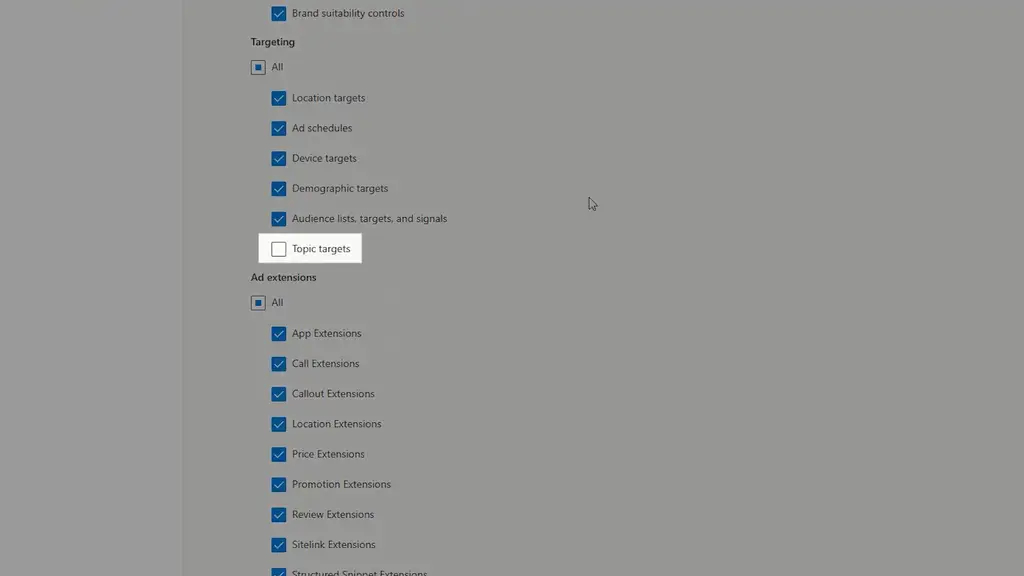
Same with “Logo Extensions”, just manually do that yourself. Don’t import “Conversion Goals”. I’ll show you how to set that up later as it requires your own code.
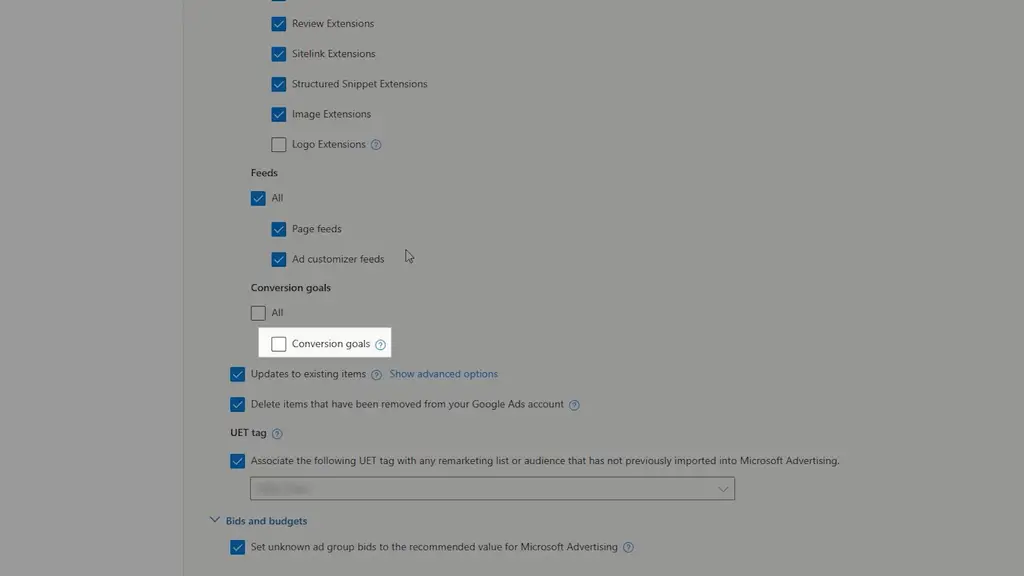
You can copy these other settings if you like but they’re really up to your discretion and strategy. Click next.
On the “Set schedule” page configure time of day, and then whenever you make these changes, enable “Run import now”, that way your account will update straight away based on these settings, and then click “Start import”.
Afterwards, go back into your import history and check for errors. The process for reviewing errors is cumbersome, and not every error will affect performance. For example, some content-label errors may be harmless. Review each one but do not assume the entire import has failed because a minor warning appears.
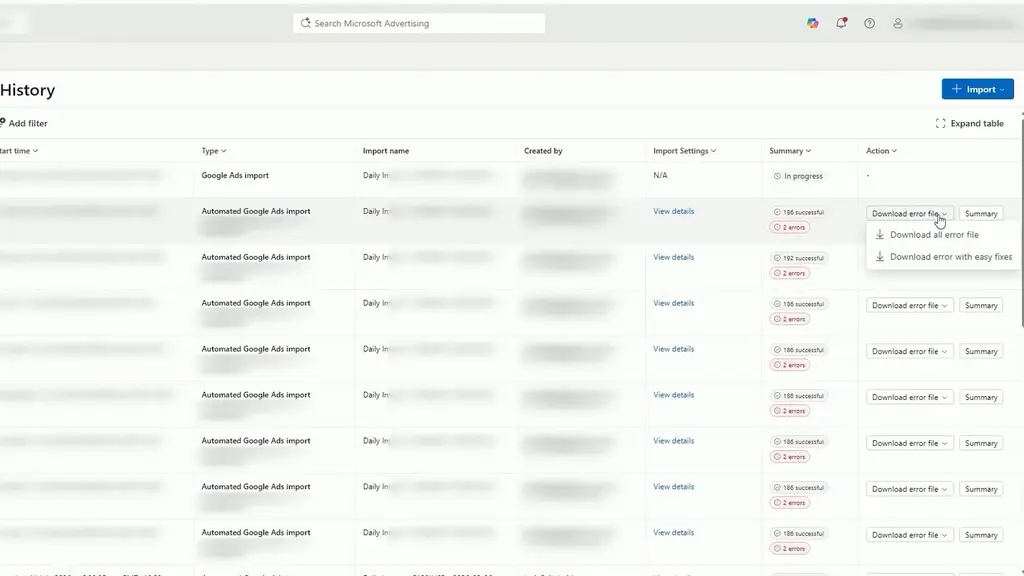
At this point, you’ve got a good import configuration, but Microsoft still cannot tell a valuable click from a sale. That means it is effectively spending with a blindfold on. The next two steps remove it.
Step 3: Install the UET Tag on Your Shopify Store
That’s Microsoft’s tracking pixel, a small piece of code that tells the platform when someone buys.
You add it through Customer Events in your Shopify settings, then create a purchase goal inside Microsoft Ads. Set that goal to mirror your main Google conversion so both platforms count sales the same way. Skip this step and both you and Microsoft won’t reliably see which traffic becomes revenue.
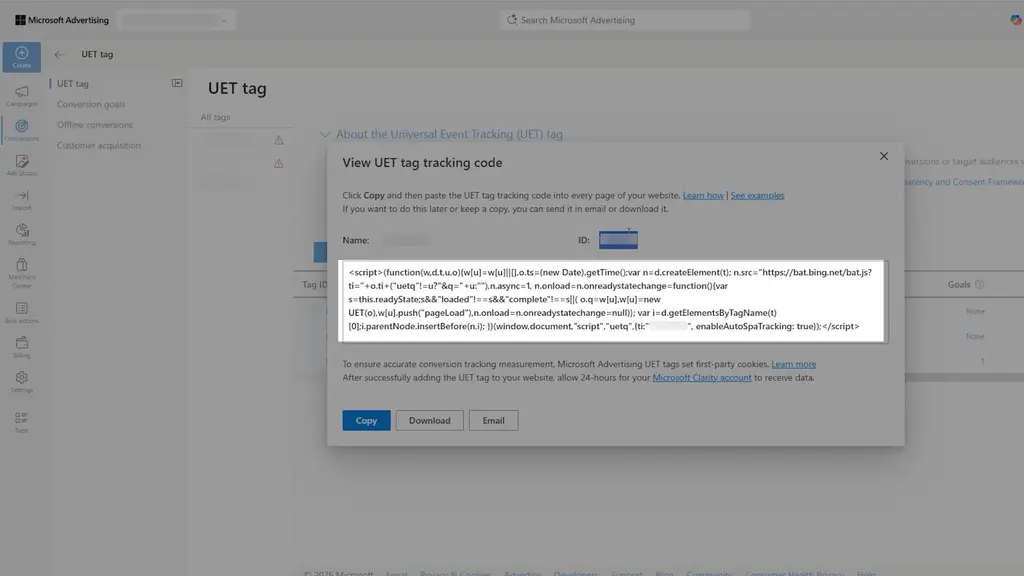
For the UET tag set up, this is the ID that we want to have available. So in Shopify admin go to “Settings”, then “Customer events”. Create a new conversion code, and call it ‘Microsoft ads tracking’ and set “Permission” to “Marketing” and “Analytics”, and configure “Data sale” to what’s needed for your store.
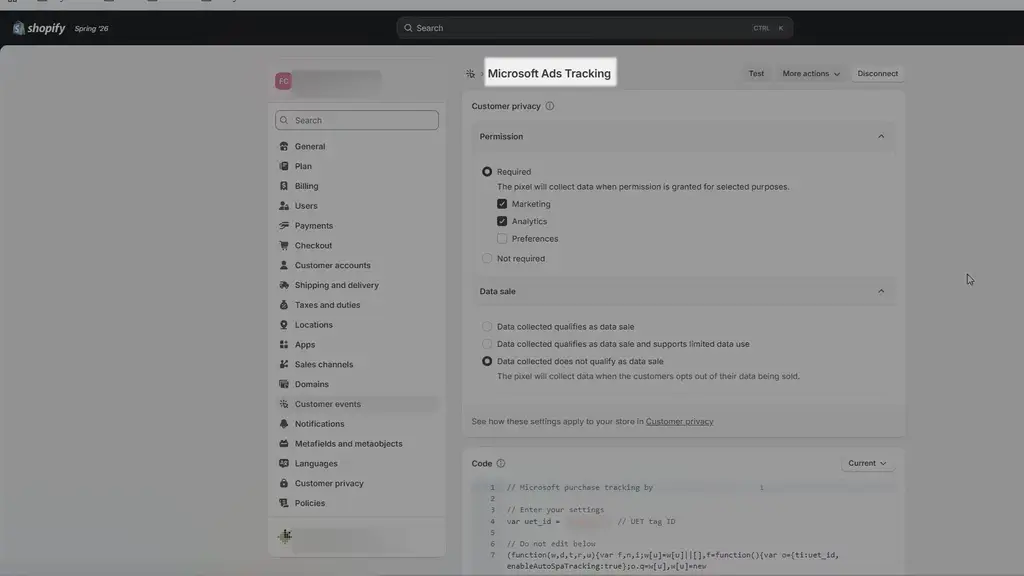
Here is the copy-and-paste code to track Shopify sales in Microsoft advertising. It includes enhanced conversions:
// Microsoft purchase tracking by digitaldarts.com.au v1.1

// Enter your settings
var uet_id = "XXXXXX"; // UET tag ID

// Do not edit below
(function(w,d,t,r,u){var f,n,i;w[u]=w[u]||[],f=function(){var o={ti:uet_id, enableAutoSpaTracking:true};o.q=w[u],w[u]=new UET(o),w[u].push("pageLoad")},n=d.createElement(t),n.src=r,n.async=1,n.onload=n.onreadystatechange=function(){var s=this.readyState;s&&s!=="loaded"&&s!=="complete"||(f(),n.onload=n.onreadystatechange=null)},i=d.getElementsByTagName(t)[0],i.parentNode.insertBefore(n,i)})(window,document,"script","//bat.bing.com/bat.js","uetq");

analytics.subscribe("checkout_completed", (event) => {

  window.uetq = window.uetq || [];
  window.uetq.push('set', { 'pid': {
    'em': event.data?.checkout?.email,
    'ph': event.data?.checkout?.phone
  } });
  window.uetq.push('event', 'purchase', {
    'revenue_value': event.data?.checkout?.totalPrice?.amount,
    'currency': event.data?.checkout?.currencyCode
  });

});
Paste the template code, update the “uet_id” value here with the UET tag from Microsoft, and click Save. Connect the pixel. That’s how you configure the UET and tracking code.
You can breathe a sigh of relief because that single step does most of the technical work for the next step as well.
Step 4: Set Up Conversion Tracking
Little did you know, you’ve done most of this already.
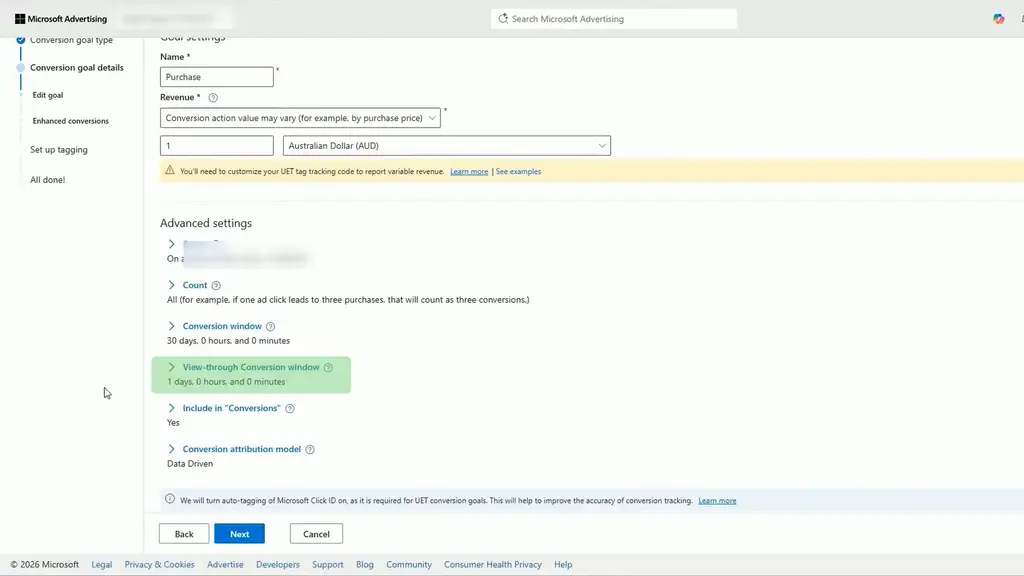
Go into “conversion goals” where you’ll configure a purchase goal. In “Goal Category”, select Purchase. Select “Event”, click Next. Configuring the conversion action value may vary by purchase price, and you can just pre-fill it with $1. Select your currency. Configure the “Conversion window” to 30 days, one day “View-through”, set Include in “Conversions” to yes, and set the data on the “Conversion attribution model” to “Data Driven”.
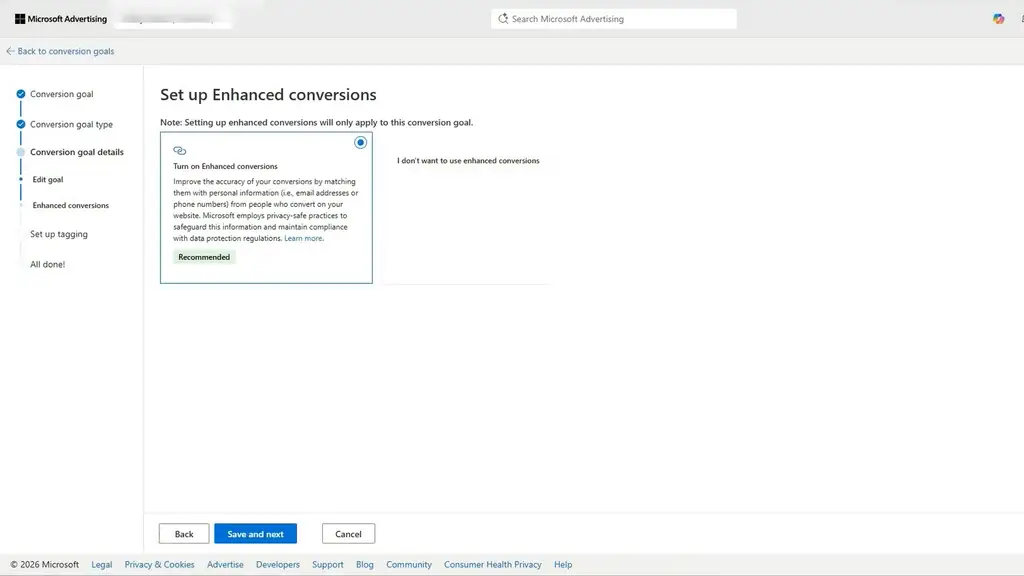
Enable “Enhance conversions”. This is configured within the code we pasted into Shopify admin, with email and phone number, which is the maximum fields that is possible for Microsoft currently, in enhanced conversions.
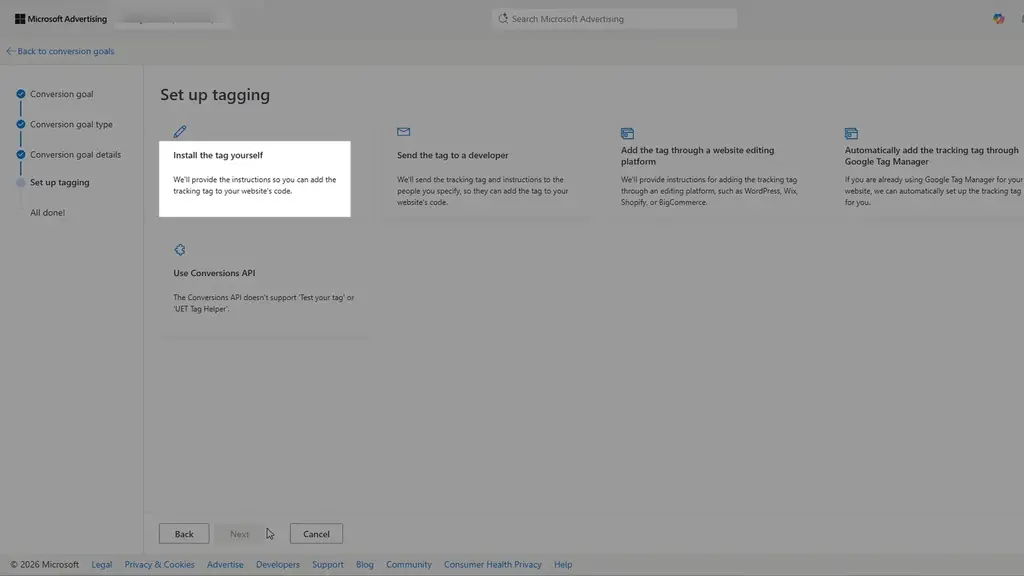
And depending if you have set up UET tag from earlier, then yes or no based on this, “Install the tag yourself”, click Next, and just click continue.
Then click Manual Installation, you want to set an action of “Equals to” “purchase” which matches the conversion code. And enable “Track event on inline action.”
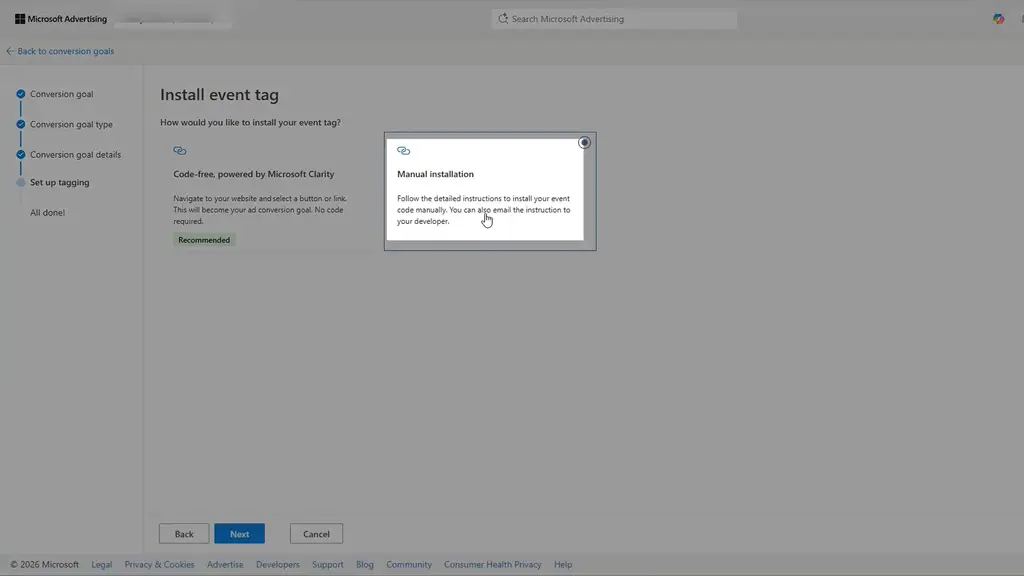
Click “Save and next” and your conversion tracking and UET tags for Microsoft is all set up.
Microsoft can now connect an ad click to an order instead of trying to optimise around anonymous activity. The next step is helping it understand the products.
Step 5: Connect Microsoft Merchant Center
This is what powers shopping ads, the placements that show a product image, title, and price directly in the search results.
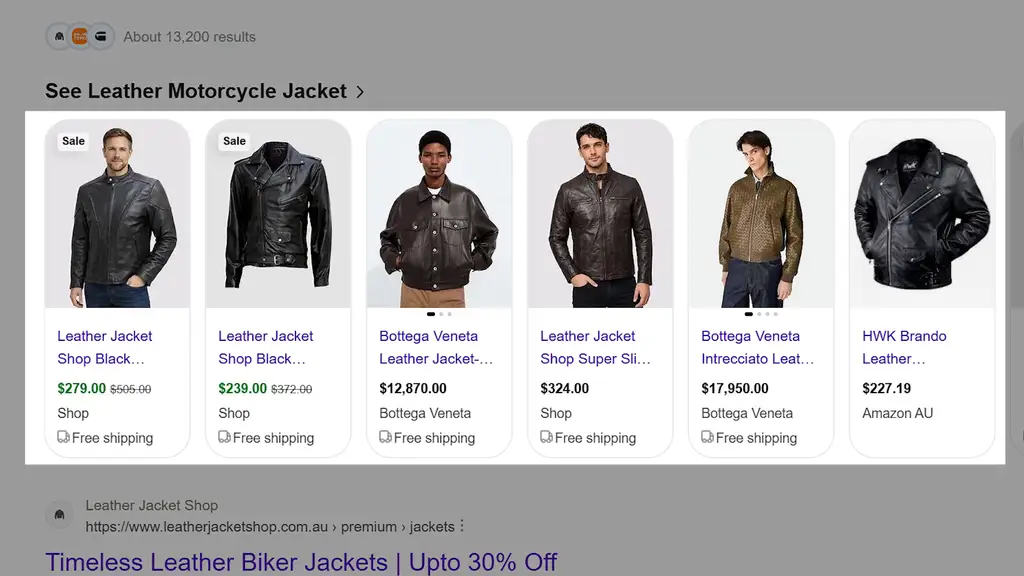
The good news is you can reuse the same product feed URL you already built for Google Shopping.
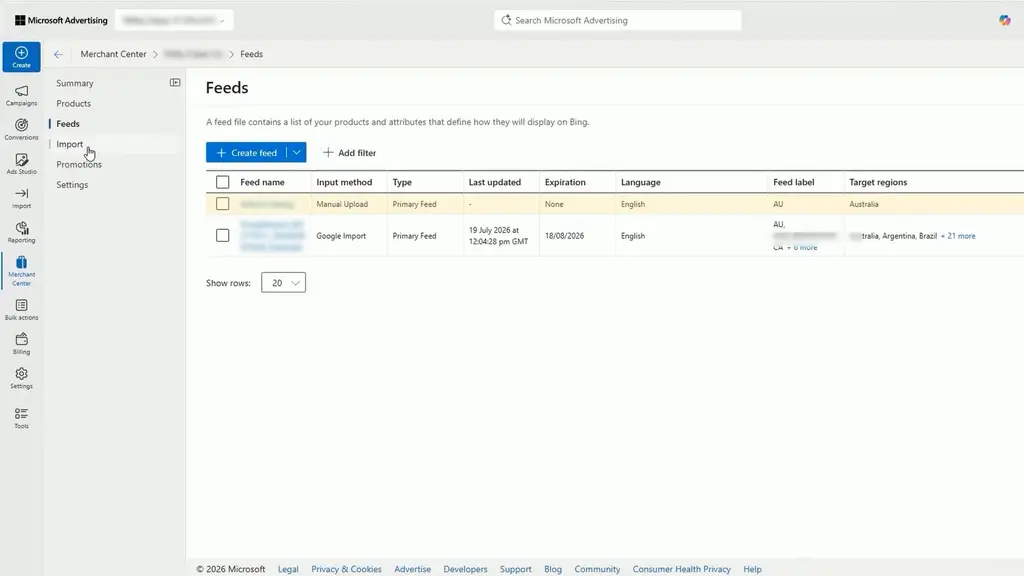
I’ve got to admire Microsoft for their ad strategy. Early on they tried to compete. But they eventually figured out to take an Avis strategy of just being second best in the search ad game, by helping marketers import things to ease their load. This helps people use the platform more so they get more advertisers and more money.
Here’s how to do it: Create a store, if it’s the first time you’re setting up a Merchant Centre account. Import an existing store from Google Merchant Centre. Follow the prompts to connect it up.
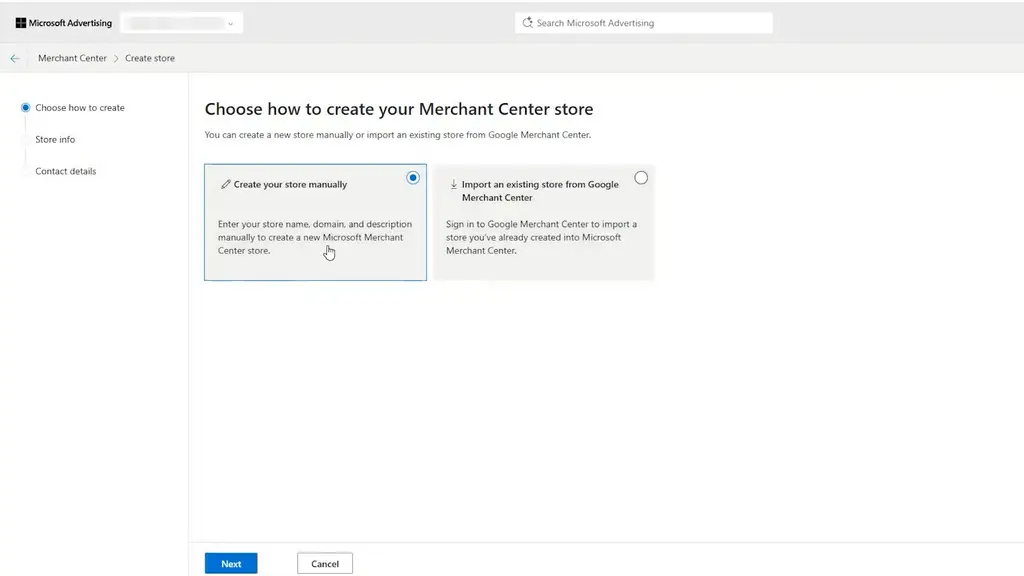
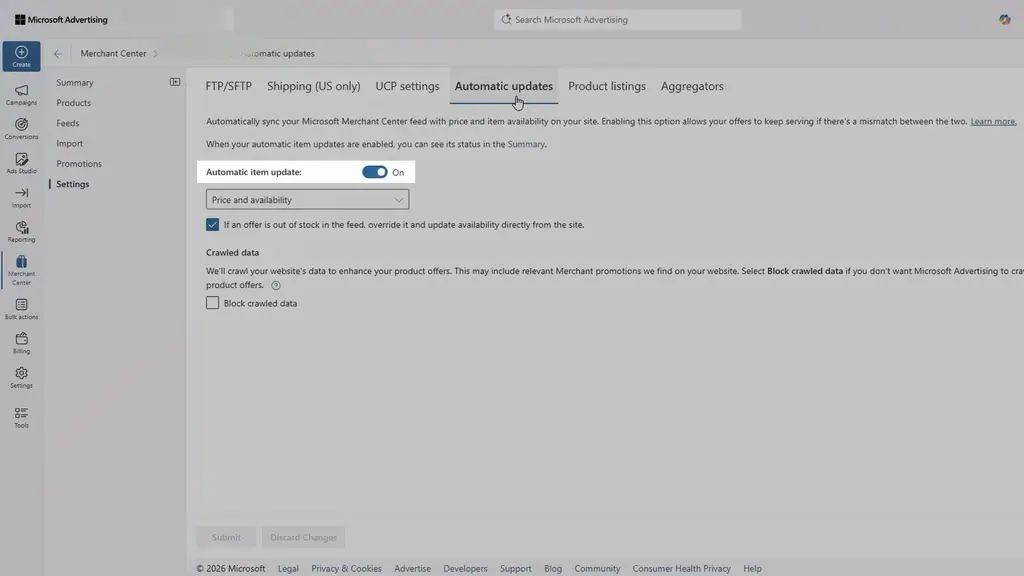
Before import, make sure it runs on a schedule, daily. In “Automatic Updates”, check “Automatic Item Update”, and enable “Price and Availability”. Check this “If an offer is out of stock in the feed, override it and update availability directly on the website.”
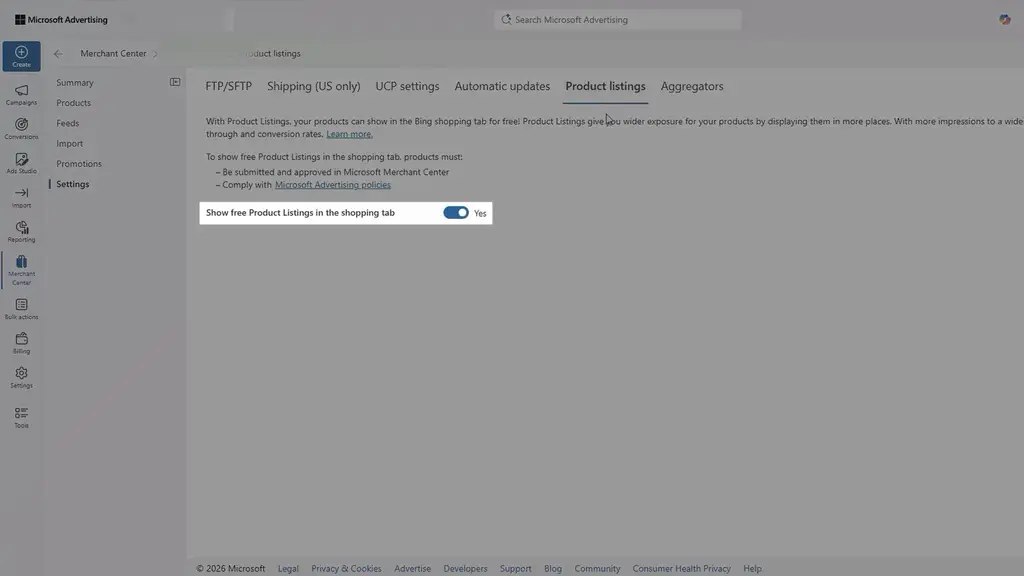
Click “Product listings” and enable “Show free Product Listings in the shopping tab”, and in Aggregators, enable “Allow all aggregators”.
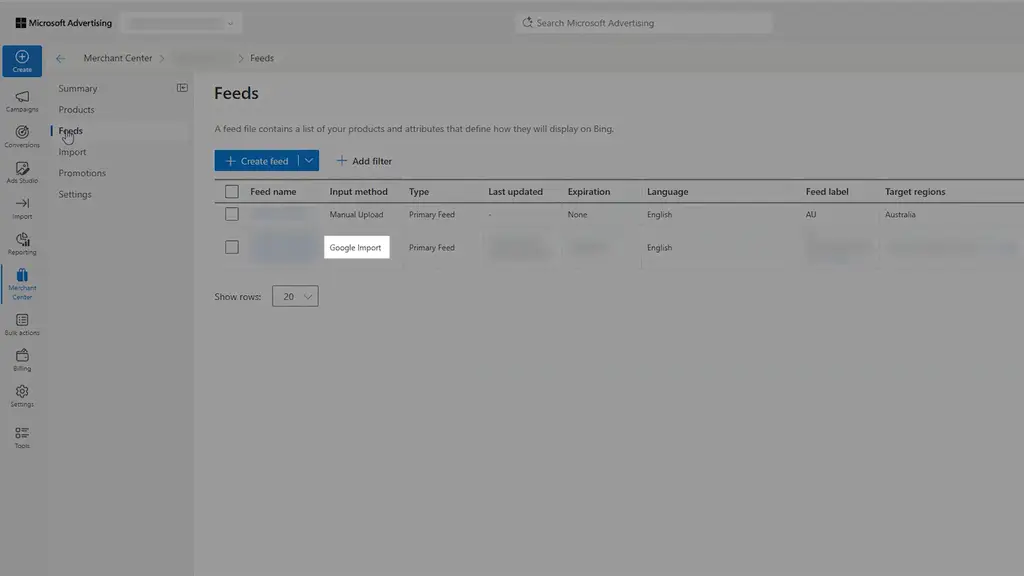
Under the Feeds tab, you’ll be able to see your products being grouped in the feed “GoogleImport”, which is your Merchant Centre import, and you can check the status of them.
Microsoft does not offer the same clean, dedicated feed-review experience that many advertisers are used to inside Google Merchant Center. If you encounter issues, you may need to download the feed and examine it manually.
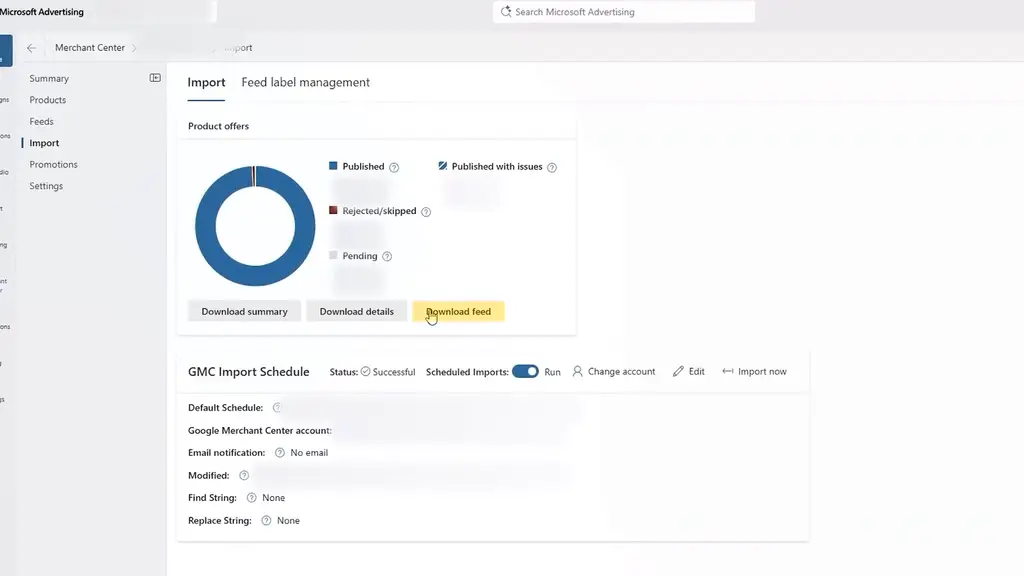
However, many of those issues will likely exist in the original Google Merchant Center feed. For that reason, fix the main product feed there and allow those improvements to flow into Microsoft.
At this point, your ads are nearly ready to run, but your budget will burn up fast if you don’t do this next step.
Step 6: Turn Off Microsoft Audience Network
This is one of the big gotcha settings I warned you about at the beginning.
It’s switched on by default when you import, and it pushes your ads onto random display placements that send junk traffic to stores like yours. I’ve seen ecommerce brands go from whinging that Microsoft ads don’t work to making profit with this one change.
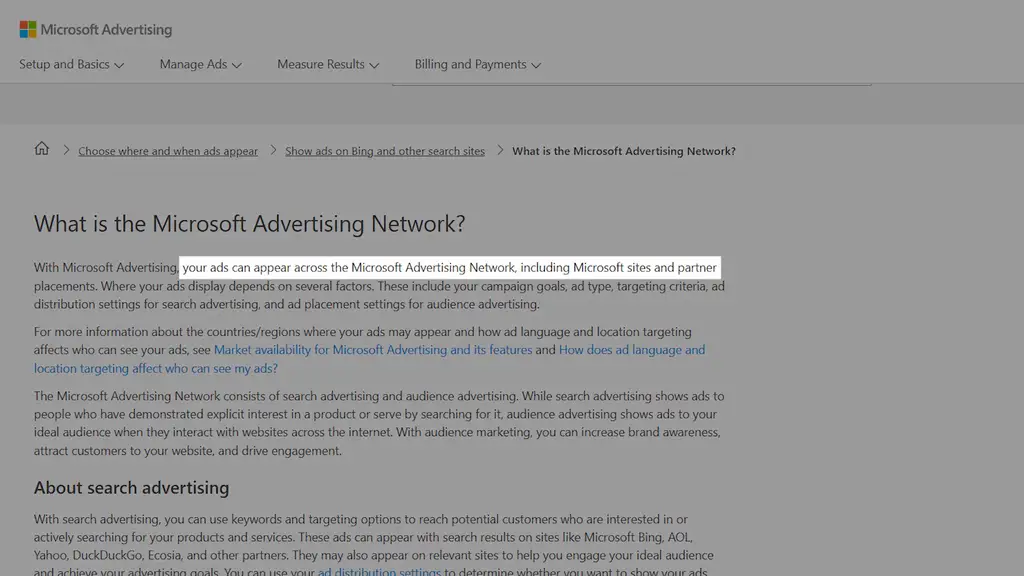
Years ago, you could switch off the audience network with a simple toggle. But, and this is just my theory, shareholders demand more profit every year so what better way to get more profit than to take it from your customers by making them pay you more.
So today there’s no simple switch to turn off the audience network. Instead, what I recommend you do is go to the Website Publisher report, filter audience in ad distribution column, and check for sites to exclude.
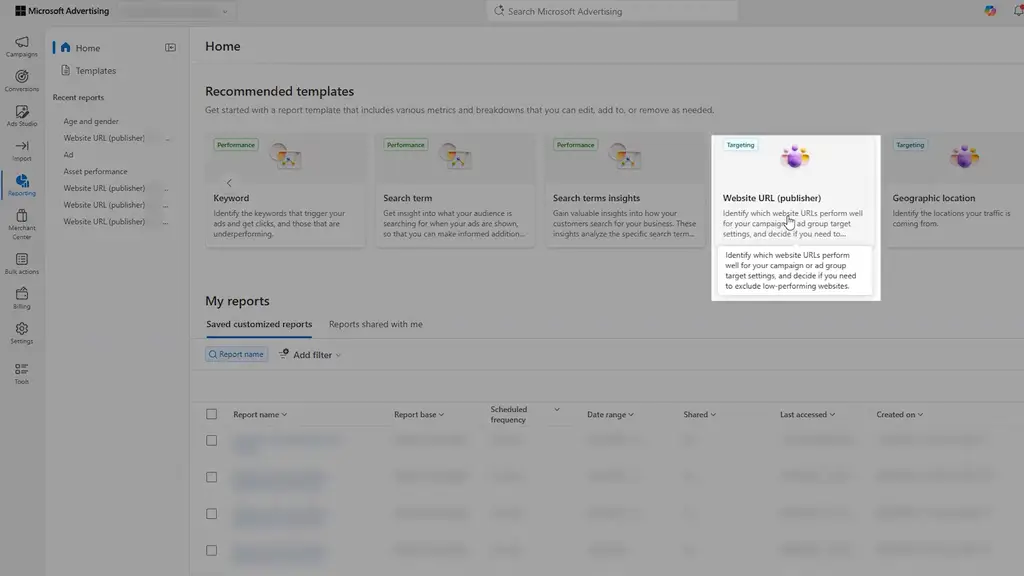
As a default, you’re most likely going to benefit from excluding big sites of msn.com, outlook.com, outlooklive.com, and bing.com. I suggest you don’t automatically add these because sometimes one or two can actually perform, although you’ll always have one or two that are a big waste of money. Make reviewing the Website Publisher report part of your regular account management to improve your ROAS.
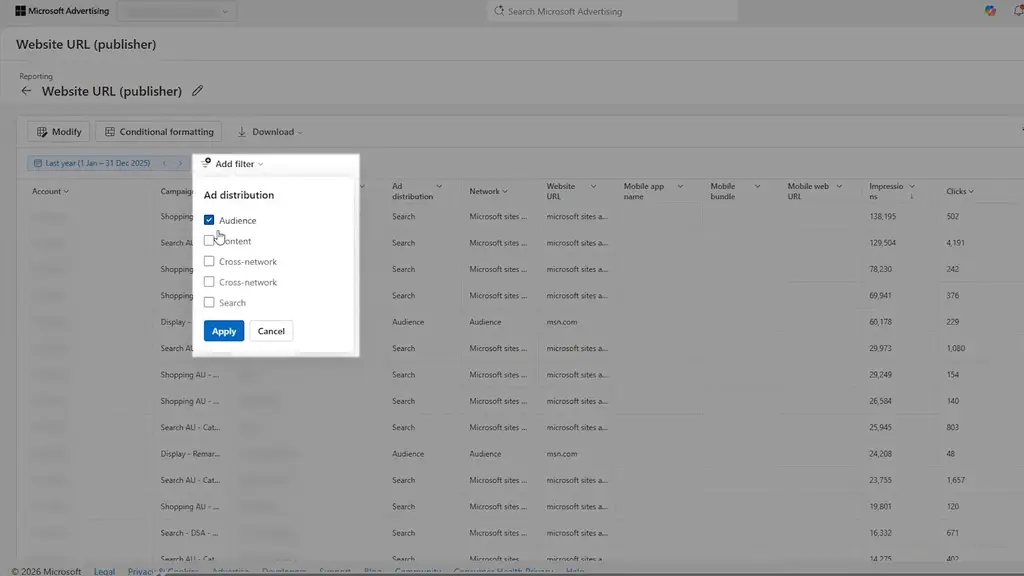
Do this on day one, not after Microsoft has wasted part of your budget. It’s the difference between telling people Microsoft Ads worked and telling people it was a waste.
Now that the junk traffic is removed, the next danger is scaling the account as though it were Google.
Step 7: Cap Your Budget
Cap your budget at around 20 percent of what you spend on Google.
Across the accounts we manage for Shopify stores, Microsoft delivers under that, up to 10 percent of the clicks and sales that Google does. The 20% is a safety net for a campaign or two that earns the right to scale. That’s the ceiling for most brands, unless your audience skews heavily to the boomers and it’s working for you.
Trying to force a Google-sized budget through Microsoft Ads is exactly how store owners end up saying the channel doesn’t work. Match the budget to the volume and the profit can follow.
A sensible budget protects the account overall. But it does not protect you from every bad click. For that, you need to see the exact words people typed.
Step 8: Check Your Search Terms Report
One of the most important optimizations you can make on a new ad account in Microsoft is to check your search terms report every week.
This is the list of actual searches that triggered your ads. This matters a lot because Microsoft matches keywords differently to Google. You’ll see queries you’ve never seen before. Broad match especially can pull in some wild stuff.
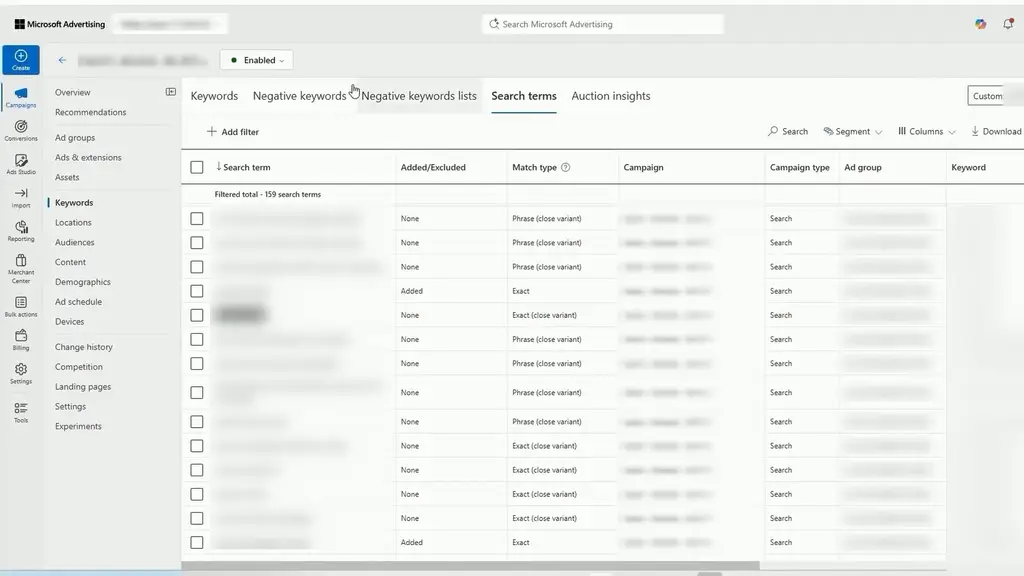
Add anything irrelevant as a negative keyword the moment you spot it. Pay for a bad search once, never twice.
You may be thinking this sounds like ordinary search-ad maintenance. It is, but it matters more during the first weeks because Microsoft is still showing you how its matching behaviour differs.
Negative keywords stop you paying for the wrong searches. The final step is making sure you are not overpaying for the right ones.
Step 9: Monitor Bids Alongside Impression Share
Impression share means how often your ad shows out of all the times it could have.
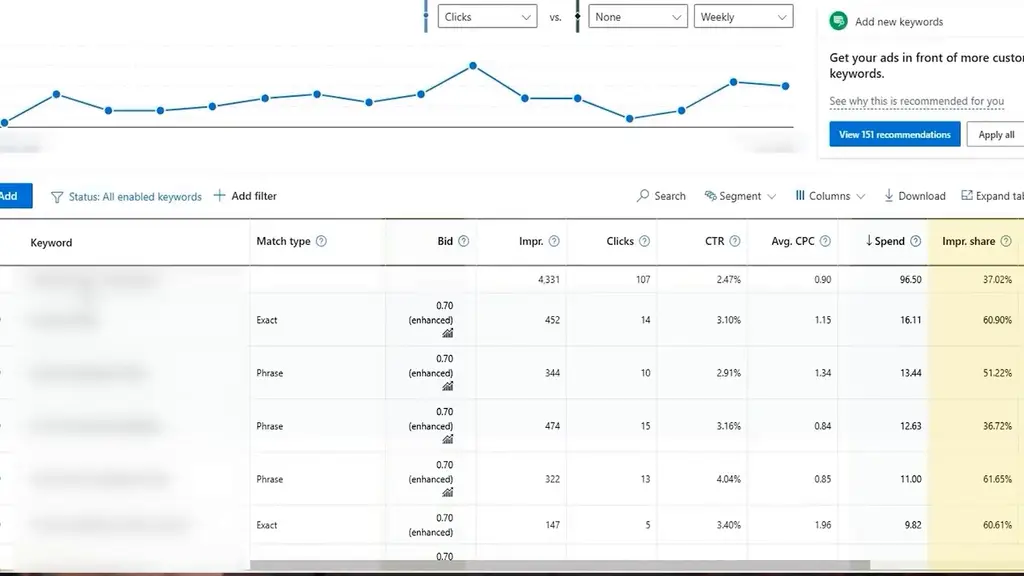
On Microsoft you’ll often find you can lower bids and still show almost every time, because there’s so much less competition.
That creates a useful test: reduce the bid gradually and watch whether impression share actually changes. You may also spot one or two keywords hogging all the spend without earning it, so trim those back.
Your goal is not to win every auction, but to win the most profitable auctions at the lowest price the market allows.
With this full structure and setup, most optimizations you make in Google Ads will also help your Microsoft ads. Do all nine of these and you’ve opened a second search channel that brings your Shopify store new customers, but your Microsoft-specific bids, budgets, controls and exclusions remain protected.
The One Limitation No Microsoft Setting Can Fix
The import only works as well as the Google Ads account behind it. If Google isn’t well structured and optimized, Microsoft simply inherits the same mess.
So before you run the import, get a second set of eyes on the Google account it’s copying from. Grab a free Google Ads audit here and fix the source first.
What You Should Do Next...
Get More Free Tactics
Join over 5,000 subscribers. I send what's working in Google Ads, SEO and Meta Ads, taken from the Shopify accounts we run.
Work With Us
We partner with a small number of Shopify stores each quarter to scale paid ads, SEO, and conversion rate. If you're serious about growth, apply below. If it's a fit, we'll schedule a call to map out your plan.
APPLY TO WORK WITH US